
 Italiano
 Deutsch
 Español
 Português
 Français


04 / Mar, 2019
Comment 44683 Views How to create a new Lightroom Catalogue and Modify Preferences
Category: Photography
Lightroom has become a very essential part of the workflow process for many photographers, including myself. I cannot imagine managing my photo catalog without Lightroom and I use it every day for my photography needs. In fact, 95-98% of my post-processing work is done in Lightroom and I only occasionally use Photoshop for advanced photo editing / retouching, which not only simplifies my workflow, but also decreases the amount of time I spend on post-processing. Over the past few years of using Lightroom extensively, I have come up with efficient ways to store, organize and access photos on my computer, so I wanted to share a few tips with our readers on how I do it for both personal and professional work. Although there are many ways to organize images, this particular method has been working great for me.
So, you have figured out where you will be storing your pictures, it is time to figure out what your folder structure will be. There are many ways to do this and everyone does it differently. I will show you what works for me and will leave it up to you to decide whether you want to adopt it or create your own. Here is my current structure:
The next tab called “External Editing” allows you to specify the default File Format and Color Space for use in external applications such as Adobe Photoshop. If you use RAW format for your images, you should always edit images in Photoshop with the best format that preserves all image details and the widest color space. I use TIFF format (default) for files and ProPhoto RGB (default) for color space for this reason. Bit Depth should obviously be 16 bits and I leave the resolution at 240 (default), with ZIP as the compression method:
So, you have figured out where you will be storing your pictures, it is time to figure out what your folder structure will be. There are many ways to do this and everyone does it differently. I will show you what works for me and will leave it up to you to decide whether you want to adopt it or create your own. Here is my current structure:
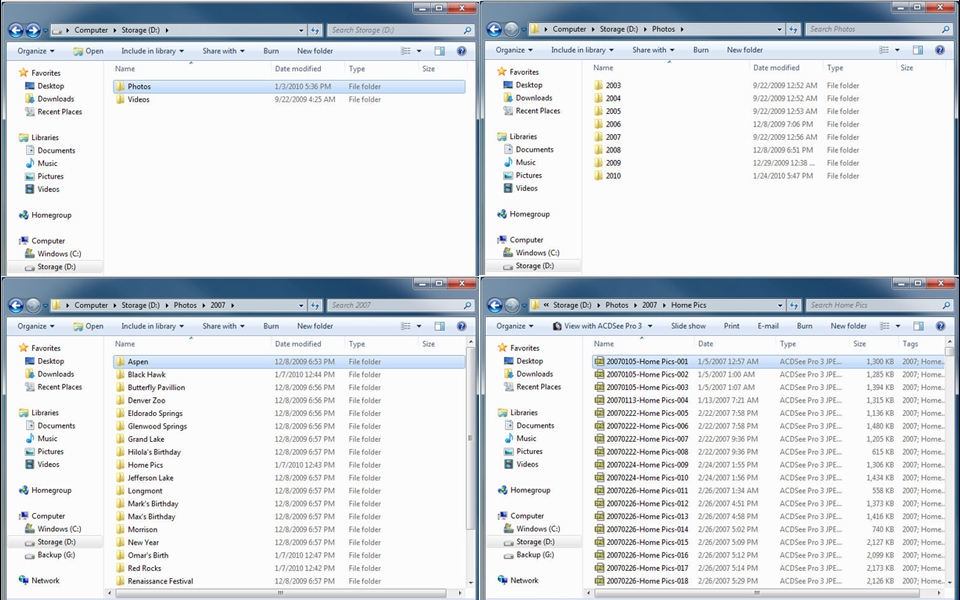
In the root of my hard drive, I have one folder called “Photos”, where I store all of my pictures. Inside “Photos”, I create one folder per year. Then inside each year, I store photographs by events. For example, a family trip to Denver Zoo in 2007 is stored in “Photos2007Denver Zoo”. If you shoot professionally, you might want to have two separate folders under “Photos” – one for your personal pictures and one for your professional work. In that case, simply add another level of folders underneath “Photos” and your structure would look like “PhotosPersonal2014My Event” or “PhotosProfessional2014My Event”.
Go ahead and create the first top level folder “Photos” and if you want to separate your personal and professional work, also create the two folders underneath. Do NOT create any more folders underneath and do NOT move or add any photos yet.
1) Create a new Lightroom catalog
Once you define and create your initial structure, it is now time to create a Lightroom catalog. Start off with a new Lightroom catalog by going to File -> New Catalog. For performance reasons, I prefer to store my catalog along with image previews on a fast SSD drive, while storing the pictures on a fast external storage array, but you might want to keep it all in the same drive for simplicity purposes. If you have under 10,000 pictures, you can store them all in a single catalog without much impact on Lightroom performance. If you have over 10,000 pictures, then I recommend creating one Lightroom catalog per year. Just create one folder in the root folder called “Lightroom” and store all of your catalogs there.
2) Modify Lightroom Preferences
For every new catalog I create, I slightly modify the default settings to fit my needs. Although you can do this later, it is probably best to do it in the beginning, as you might forget to take care of it later. The first thing I make sure is set up right (you only need to do it once) is Lightroom Preferences. Go to Edit -> Preferences and under the “General” tab, set similar settings as shown below: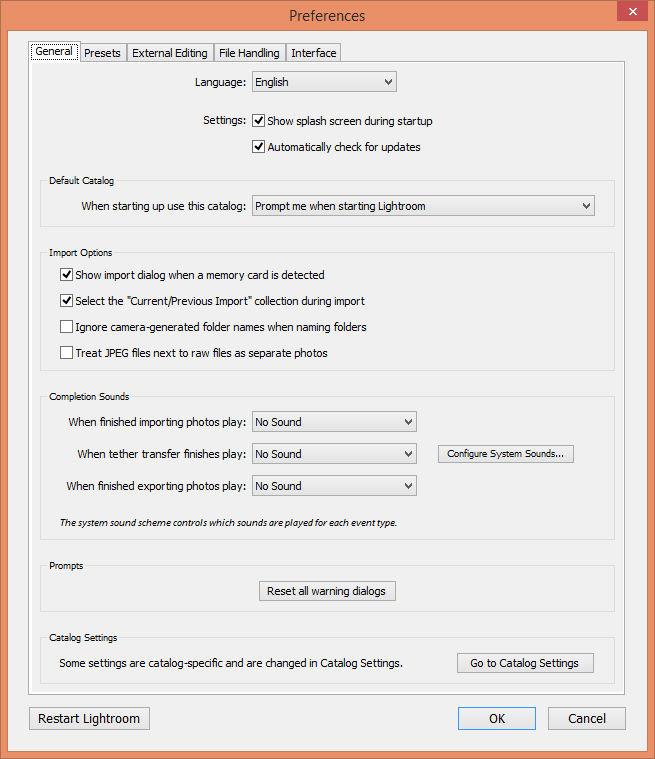
There are two settings that I changed here. I modified the “Default Catalog” option, where I set it to “Prompt me when starting Lightroom” – this basically makes Lightroom prompt which catalog I want to load when I start up Lightroom, which is convenient if you use multiple catalogs. If you only have a single catalog, there is no need to change the default setting. The second option is “Show import dialog when a memory card is detected”, which simply tells Lightroom to automatically fire up the import screen when you insert your memory card.
The next tab is “Presets”, where I typically leave everything by default. The only thing that is worth mentioning on this page is the “Location” where you can check or uncheck “Store Presets with Catalog”. Lightroom allows storing your user presets (such as default import settings, file naming convention, copyright information, etc.) either in a general folder that is used for all of your catalogs, or in each of your Lightroom catalogs where you can set different presets depending on the catalog. I personally use one preset for all of my Lightroom catalogs and recommend leaving this option unchecked as seen below: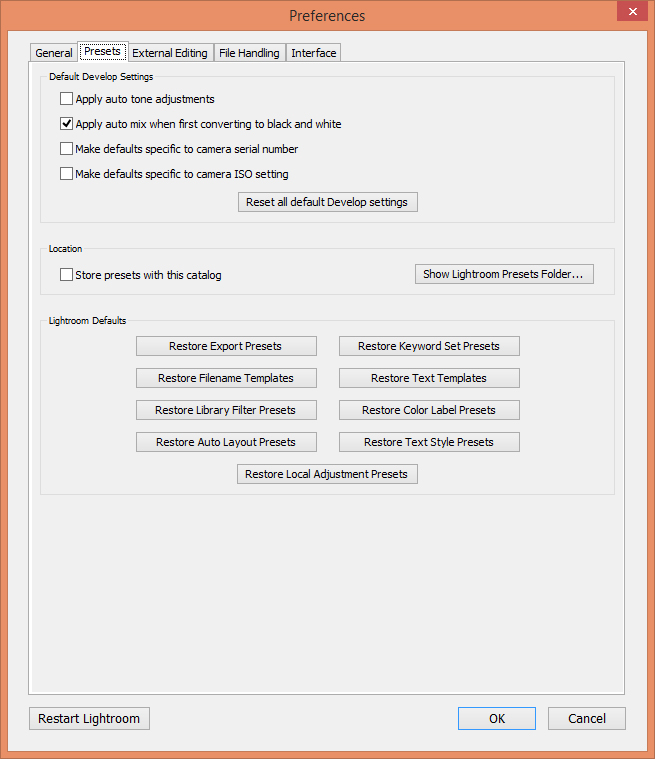
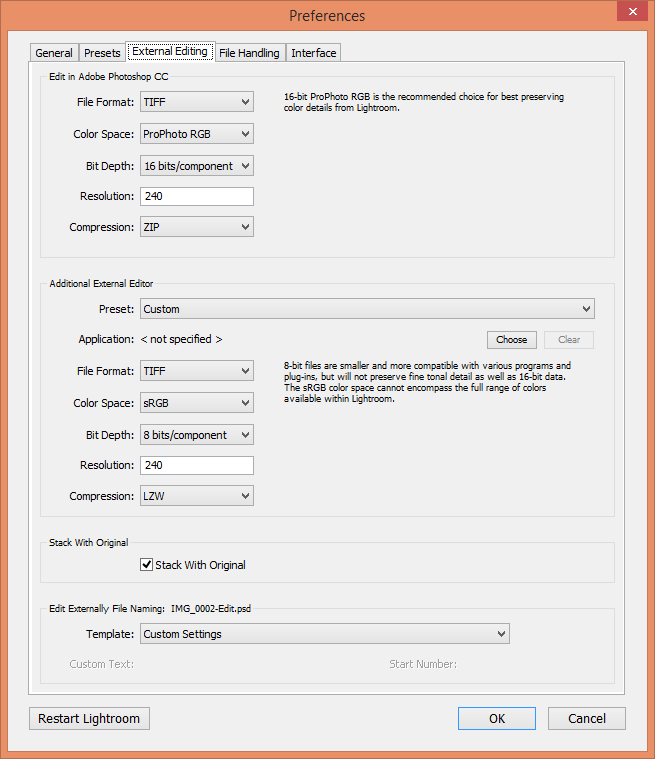
The next tab called “External Editing” allows you to specify the default File Format and Color Space for use in external applications such as Adobe Photoshop. If you use RAW format for your images, you should always edit images in Photoshop with the best format that preserves all image details and the widest color space. I use TIFF format (default) for files and ProPhoto RGB (default) for color space for this reason. Bit Depth should obviously be 16 bits and I leave the resolution at 240 (default), with ZIP as the compression method:
I also leave “Stack With Original” checked, so that an image that is edited externally stays attached to the original RAW file.
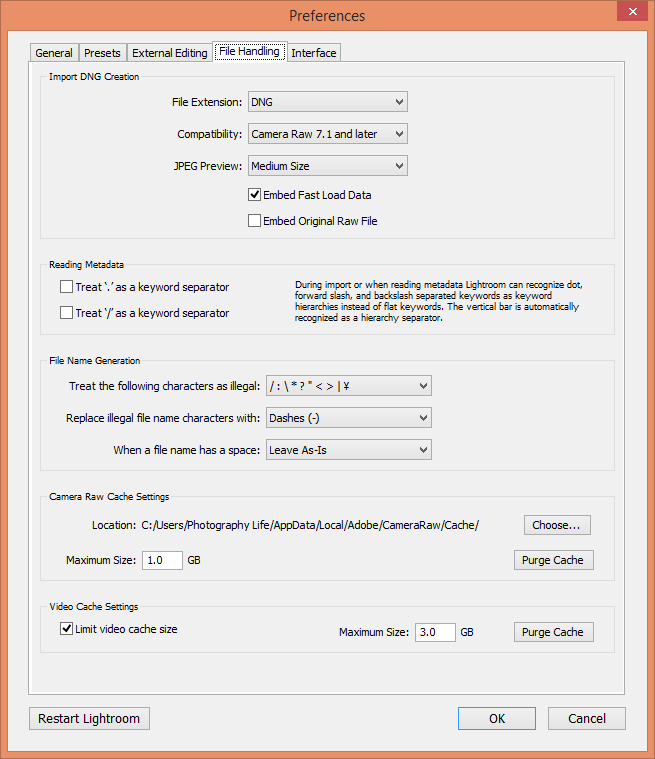
Let’s now move to the “File Handling” tab. This particular tab is very important, because it controls the way your pictures are imported into the catalog. Here is how I have my File Handling tab set:
Pay attention to the “Import DNG Creation” settings on this page. I set “File Extension” to “DNG”, “Compatibility” to the latest Camera Raw version available, “JPEG Preview” to “Medium Size” and left “Embed Original Raw File” unchecked. The important settings here are “JPEG Preview” and “Embed Original Raw File” that control the total size of your DNG files. By default, every RAW image contains a full-size JPEG image inside that is stored as a “Preview” (the “Preview” image is what you see on the back of your camera when you take a picture). By setting the “JPEG Preview” option to “Medium Size”, you are telling Lightroom to generate a smaller version of a preview inside DNG files, which will save you up to 15-20% of space per file (depending on the size of the RAW file). While you might think that it is not such a big deal, it does a make a huge difference when you have tens of thousands of pictures. The only penalty is the fact that the image opens slightly slower when you try to open a full version of it in Lightroom later, simply because it has to generate a full size version from the RAW image. If the speed is important, you could always generate full size previews in Lightroom later. The checkbox “Embed Original Raw File” is something I would recommend to leave unchecked, because if you check it, your DNG files will actually be much larger than the original RAW file (DNG + RAW will be combined in a single file).
I leave the last “Interface” tab at its default settings.
3) Modify Lightroom Catalog Settings
The next thing we need to modify, is your Lightroom Catalog Settings. You will have to do this once for each of the catalogs that you create. Go to Edit -> Catalog Settings to bring up the “Catalog Settings” window. I usually leave everything to default values in “General” and “File Handling” tabs. However, if you want Lightroom to render bigger previews to match your monitor resolution, pick a different value under “Standard Preview Size”. Note that the larger the preview size, the more space Lightroom’s cache will take on your hard drive.
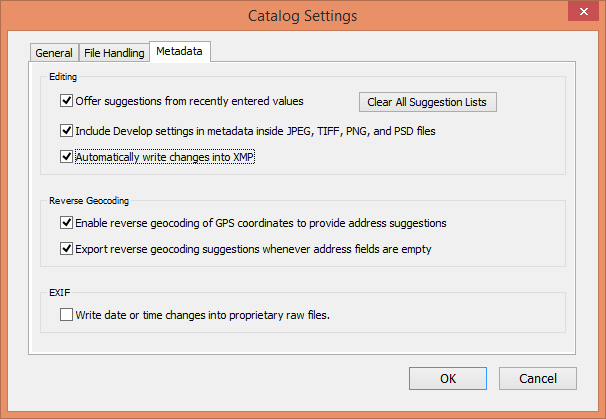
The most important tab for me here is the “Metadata” tab, where I can specify what data is written into my images by Lightroom:
The first two options “Offer suggestions from recently entered values” and “Include Develop settings in metadata inside JPEG, TIFF, and PSD files” are checked by default and I do not touch them. The last option “Automatically write changes into XMP” is unchecked by default. This is the one I usually recommend to turn on, because it makes Lightroom write your changes right into the DNG files (or XMP sidecar files that go with your RAW files) as you work on them. Why is it important? Because if your Lightroom catalog was to fail and you lost all of your catalog data, the image file would still keep all changes that you’ve made in Lightroom! It is also very useful if you happen to open that same file in Photoshop or other Adobe applications, because all changes will be immediately visible as you work on the file. And if you were to lose your Lightroom catalog completely, you could just import all the images from your hard drive and all changes would migrate through (except for the history). The penalty of keeping this option checked is slower performance, since every change is immediately written to the DNG / Sidecar file. If performance becomes a problem, you can turn off this setting and occasionally force Lightroom to save changes to files by selecting all files (CTRL+A in the root folder) and saving changes (CTRL+S).
4) Import your photos into the Lightroom catalog
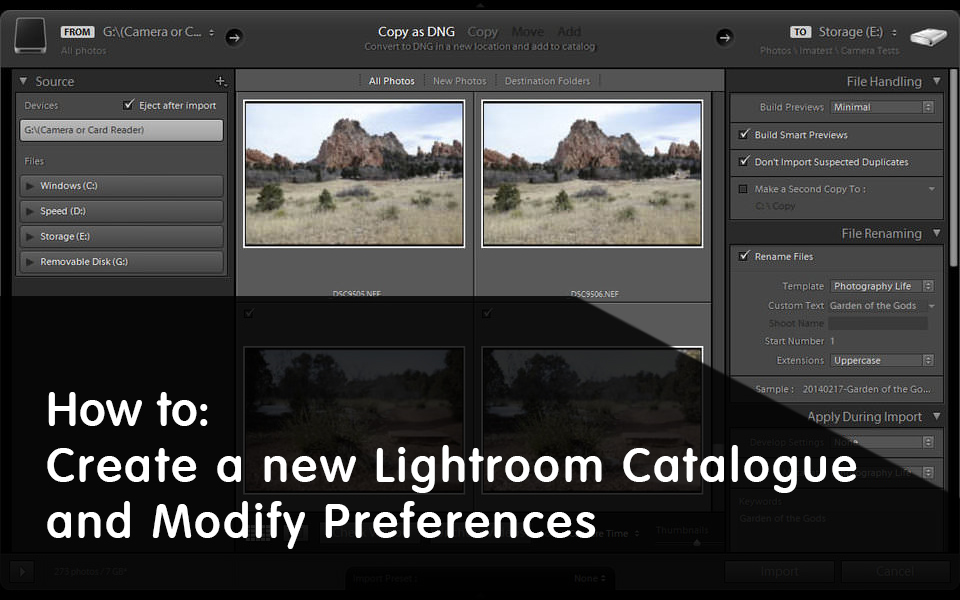
Your preferences and catalogs settings have now been modified. Let’s start importing your pictures! Fire up the photo import catalog by going to File -> Import Photos… or press CTRL+SHIFT+I on your keyboard. Once the import screen comes up, it will look like the following: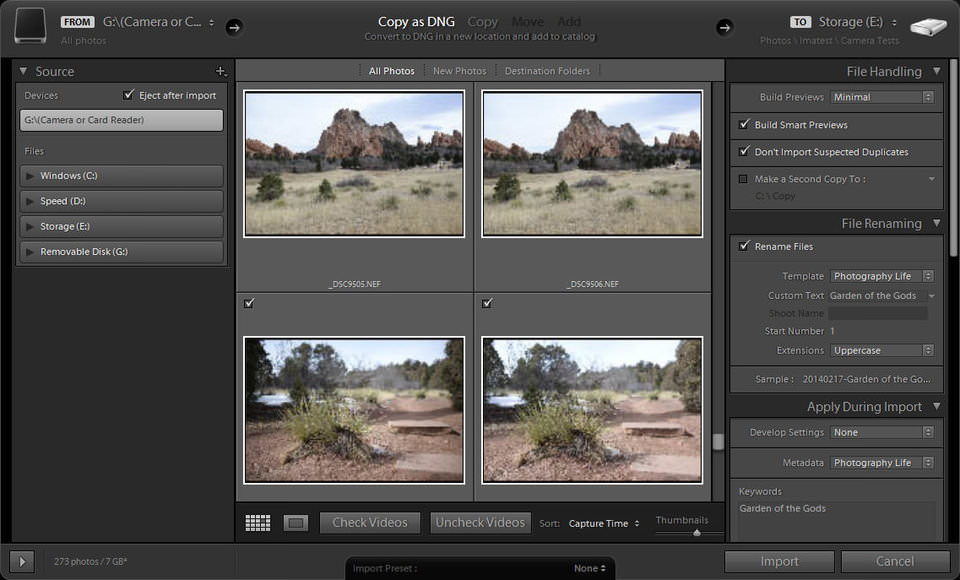
The entire import screen is organized very similarly as Lightroom itself, the left side being the location where you will be grabbing the files from, while the right side serves as the destination side, along with import settings. The middle section shows all images to be imported. The “From” section has been designed in such a way that Lightroom is able to differentiate between permanent storage and your device or card reader. The nice thing is, the import screen is dynamic, meaning whatever changes happen in the system, the screen gets updated in real time. For example, if you open the import screen and then disconnect your camera from the PC, the device will simply disappear from the screen. Reconnecting the camera will add the device back into the screen.
Since I standardize on the DNG format, I typically leave “Copy as DNG” selected in the top middle section. If you choose to keep the original RAW files, then pick “Copy” instead.
The right import menu consists of several sections: File Handling, File Renaming, Apply During Import and Destination. Let’s take a look at the first two sections – File Handling and File Renaming: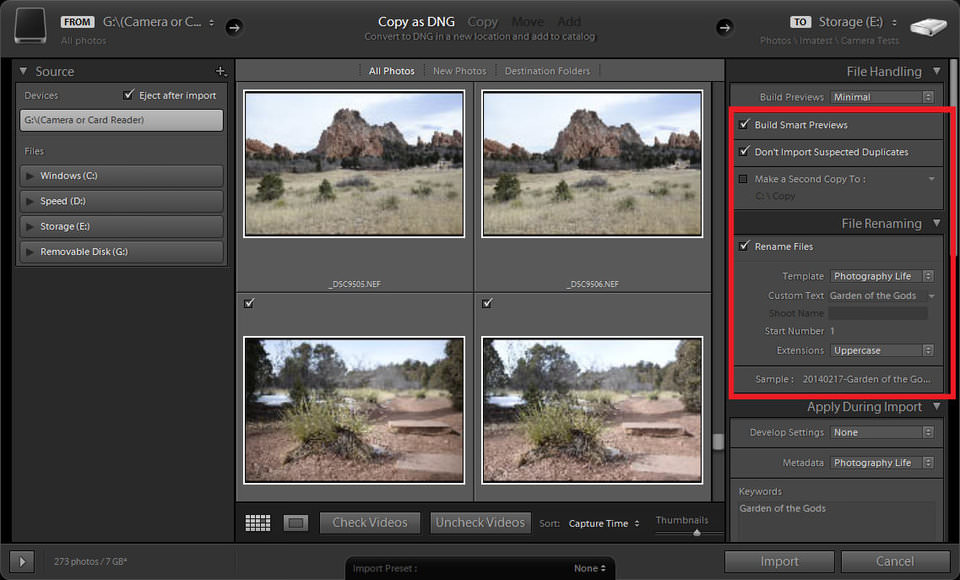
4.1) File Handling Section
The File Handling section consists of four choices – “Build Previews”, “Build Smart Previews”, “Don’t Import Suspected Duplicates” and “Make a Second Copy To”. I leave the Build Previews option on “Minimal” to save time during file import. However, if you have plenty of storage and you want to speed up the time it takes for your files to render when you zoom into them, you can set this option to “1:1”, which will generate full previews.
The “Build Smart Previews” option can be very useful for situations where you have a laptop that stores just the catalog and your actual images are stored on external storage. If you happen to travel and need to disconnect from your storage, keeping this option turned on will create image previews that you will be able to work on, as if you were still connected to your storage. Once you come back and reconnect to your external storage, all the changes will be retained. If you are using a desktop PC and the storage is attached permanently, I would turn this option off.
I always keep “Don’t Import Suspected Duplicates” turned on and I do not use Lightroom’s way to back up imported images, so I keep the last option “Make a Second Copy To” turned off.
4.2) File Renaming Section
The File Renaming section consists of variables that are used for renaming your files. I always rename my files to the following format: “YYYYMMDD-Custom Text-Sequence Number.DNG”. The first part is the file date, for example “20140217”, which stands for February 17, 2014. Then a dash is followed with a custom text that I type during each import, which is then followed by an incremented sequence number. I like renaming my photos, because I do not like to keep photo names like “DSC_1000.DNG” that mean nothing and get duplicated over time. By renaming the photos, I know that I could simply take all images from all folders and put them all into a single folder without running into duplicate file names. I highly recommend taking the same or a similar approach and uniquely identify every image you import.
If you have not already created a rename template, take a look at the following:
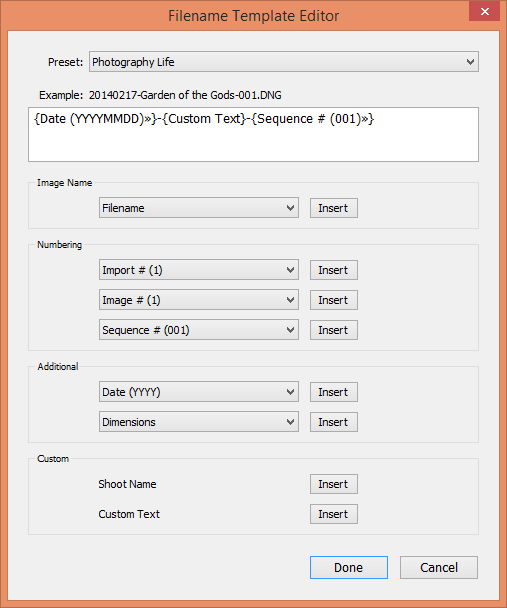
Create a similar template, then save it as a Preset and click “Done”. Then simply select your preset under the “Template” drop-down.
The next field under “File Renaming” is Custom Text – the text you can type to identify images. For this example, I used “Garden of the Gods” as custom text, which means that my first file will be named like “20140217-Garden of the Gods-001.DNG”. The “Start Number” field lets you type the first number that the system will use, so if you type “500”, your first file name will have a sequence number of 500 and all consecutive numbers will be incremented by one. This is very useful during multiple imports into the same folder structure – I simply look at the total number of photographs in my memory card and put the number in that field. I always leave the extension in uppercase for consistency.
4.3) Apply During Import Section
This section is another important one, since it lets you choose an import preset with your Lightroom settings, write Metadata and Keywords into each image as it gets imported. I have already made some changes to the way I import files and being able to choose what you want before the import process starts is a great idea, because it saves tons of time for me during the image editing process. Once you make changes to an image and save the preset, it will immediately show up on this screen.
The next field is called “Metadata” and it is used for writing additional data into each imported file. For example, if I wanted to include my copyright text in every image (do not confuse this with a watermark), I would need to create a new Metadata preset and make some changes:
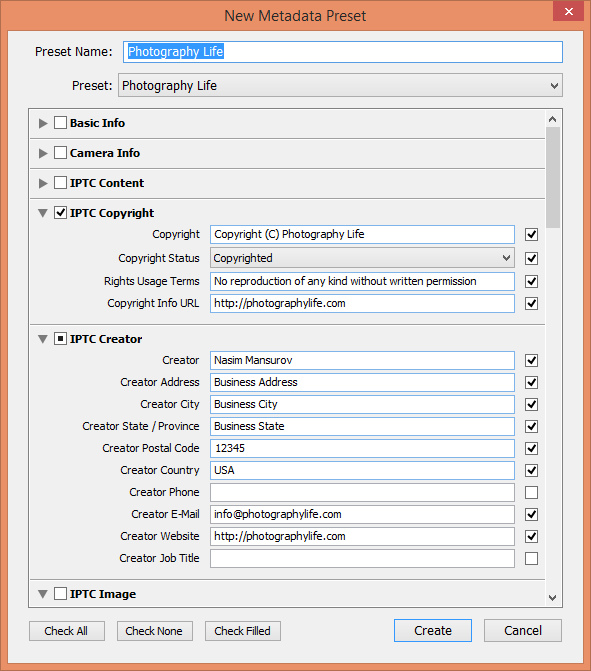
I wouldn’t waste time by filling out every single field and only pay closer attention to IPTC Copyright and IPTC Creator fields, where you can provide your name and contact information.
The last field is “Keywords” and that’s where I type keywords related to what I am importing. Keywords can be great to be able to locate photos by event, location, theme, etc. For the above example, I used “Garden of the Gods” keyword, which saves this keyword to each file and the Lightroom database. If I go back to the Garden of the Gods again later this year, I would use the same Keyword to group the two events together. That way, even if I end up putting photos into different folders, I will still be able to locate them by this keyword.
4.4) Destination Section
The last section identifies the location of where the import process will store files. The first field is called “Into Subfolder”, which I always leave checked, since I do want Lightroom to create subfolders for me. The next field is a drop-down with two options: Organize “By Date” and Organize “Into one folder”. If you select Organize “By Date”, you will get an additional field called “Date Format”, where you can specify the format of the subfolders that will be created by Lightroom. Since I already have a folder for each year and my file names already contain the full date, I do not feel the need to create subfolders for year, month and day. Instead, I like to keep everything simple and organized, instead of having many different subfolders in the system. Therefore, I always choose “Organize Into one Folder” and then type the name of the subfolder:

Since I store all of my images in a master folder called “Photos” and then subfolders by year, I simply select the year under “Photos”, as shown above.
As you can see, the system is set to create a folder under “E:Photos2010” called “Gardens of the Gods”, where all the photos will be imported. If I pay another visit to the Garden of the Gods, I will choose the same folder and the system will create files with a different date, so I won’t ever run into any problems with duplicate file names.
I always sort my import images by “Capture Time” under “Sort” drop-down. Once you choose the destination folder, simply click the “Import” button to start importing your images. The import window will go away and you will start seeing the images popping up in your Lightroom catalog.
5) Post-import check
Now that you know how to import your images with custom templates, go ahead and import all of your pictures into Lightroom and make sure that everything gets transitioned correctly. Do not forget to change the folder names along with “Custom Text” and “Keywords” fields upon each new import in the “Import Photos” screen going forward. Otherwise, you will end up with a bunch of unwanted folders and incorrect file names and keywords. If you accidentally imported your pictures with wrong settings, it is not a problem. Just select the imported pictures, then change the keywords under “Keywording” section in the “Library” module, then rename the folder to the correct event name and press “F2” or go to Library -> Rename Photos to mass rename your pictures. If your pictures go out of sequence for whatever reason (for example your sequence numbers are repeated, but with a different name), then simply select all pictures and batch-rename them all by pressing “F2” on your keyboard. Give it a new sequence number and it will start renaming them based on the age of the image or your selection criteria.
6) Perform full backup
By now, you have done a lot of work to re-organize your photographs and you have completed importing all of your pictures into Lightroom. It is definitely a good time to perform a full backup of both your Lightroom catalog and your pictures. Many people assume that the backup functionality in Lightroom backs up their photographs too. That’s a very wrong assumption! Lightroom does NOT backup your photos – it only backs up your Lightroom catalog, which is useless without your images. You can afford losing a Lightroom database, but you cannot afford losing your pictures. Therefore, you should always backup your photographs first, then worry about Lightroom.
Here is how to perform a full backup:
- Close out of Lightroom.
- Get your external backup drive ready, plug it into your computer and turn it on.
- Go to the root folder where you are keeping your photos. In my computer it is “E:Photos”. Select this folder and drag and drop it into the backup drive’s “Photos Backup” folder or something similar, which should start the copy process.
- Wait until all pictures are copied / backed up. Make sure that you do not have any errors and the copy process is completed 100% successfully.
- Now backup your Lightroom catalog. Locate the Lightroom catalog file in your hard drive (which should have an extension “lrcat”) and also copy it to the external drive. I usually store my Lightroom catalogs in a folder called “Lightroom Catalog Backup” on my backup media.
The above process could be easily automated by third party backup programs or with some built-in backup tools within your operating system. I highly recommend to set up an automated job that backs up your computer as often as possible. I also recommend backing up your data to at least two different locations every time.


