Italiano
 Deutsch
 Español
 Português
 Français


06 / Mar, 2019
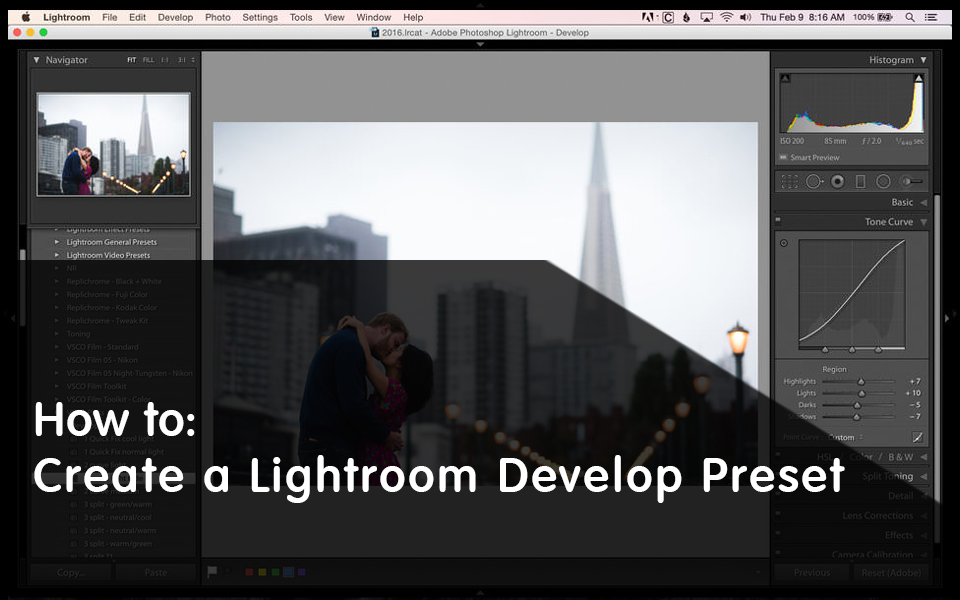
Comment 22760 Views How to Create a Lightroom Develop Preset
Category: Photography
One of the features of Lightroom that I use the most often and has probably saved me more time than any other step in my editing process is creating and using develop presets. A develop preset is simply a group of adjustments that all get applied to an image at the same time. By default, Lightroom includes a variety of presets, but you can also create your own if you want something more personalized. In this post I’ll show you the process of creating a Lightroom develop preset, as well as how to modify an existing develop preset.
An Introduction To Develop Presets
Lightroom develop presets are simply a way to make many adjustments to an image at the same time. Let’s say you find yourself making the same basic adjustments to most of your images. Maybe you add a bit of contrast, recover some highlights and increase saturation. Instead of applying these three steps individually every time you edit an image, you can create a develop preset that does them all at once. Not only that, but you can automatically apply develop presets when you import images! Before we discuss that, let’s talk about how to create a develop preset.
Creating A Lightroom Develop Preset
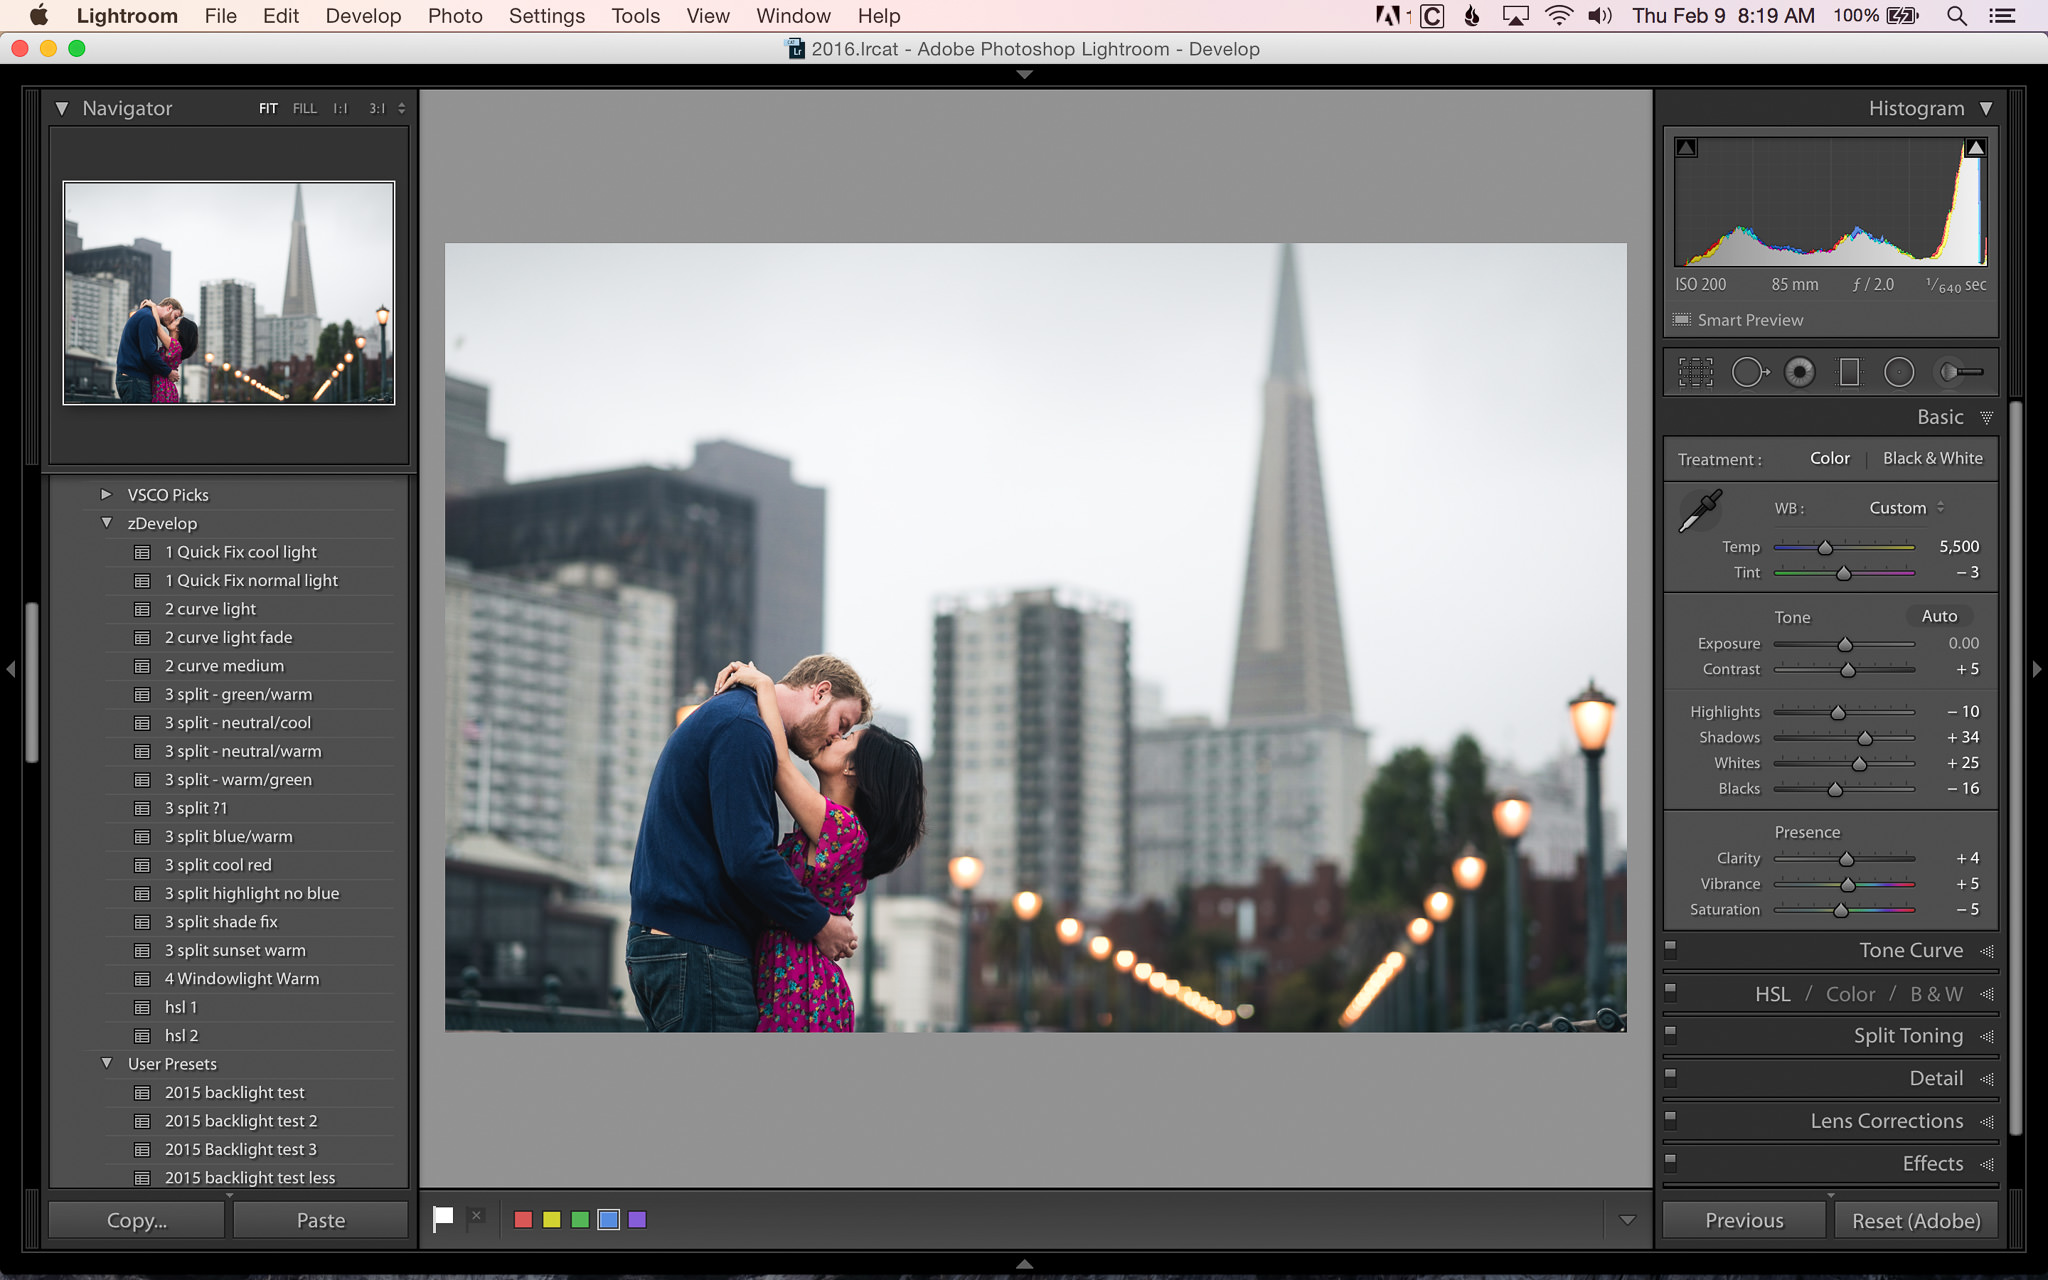
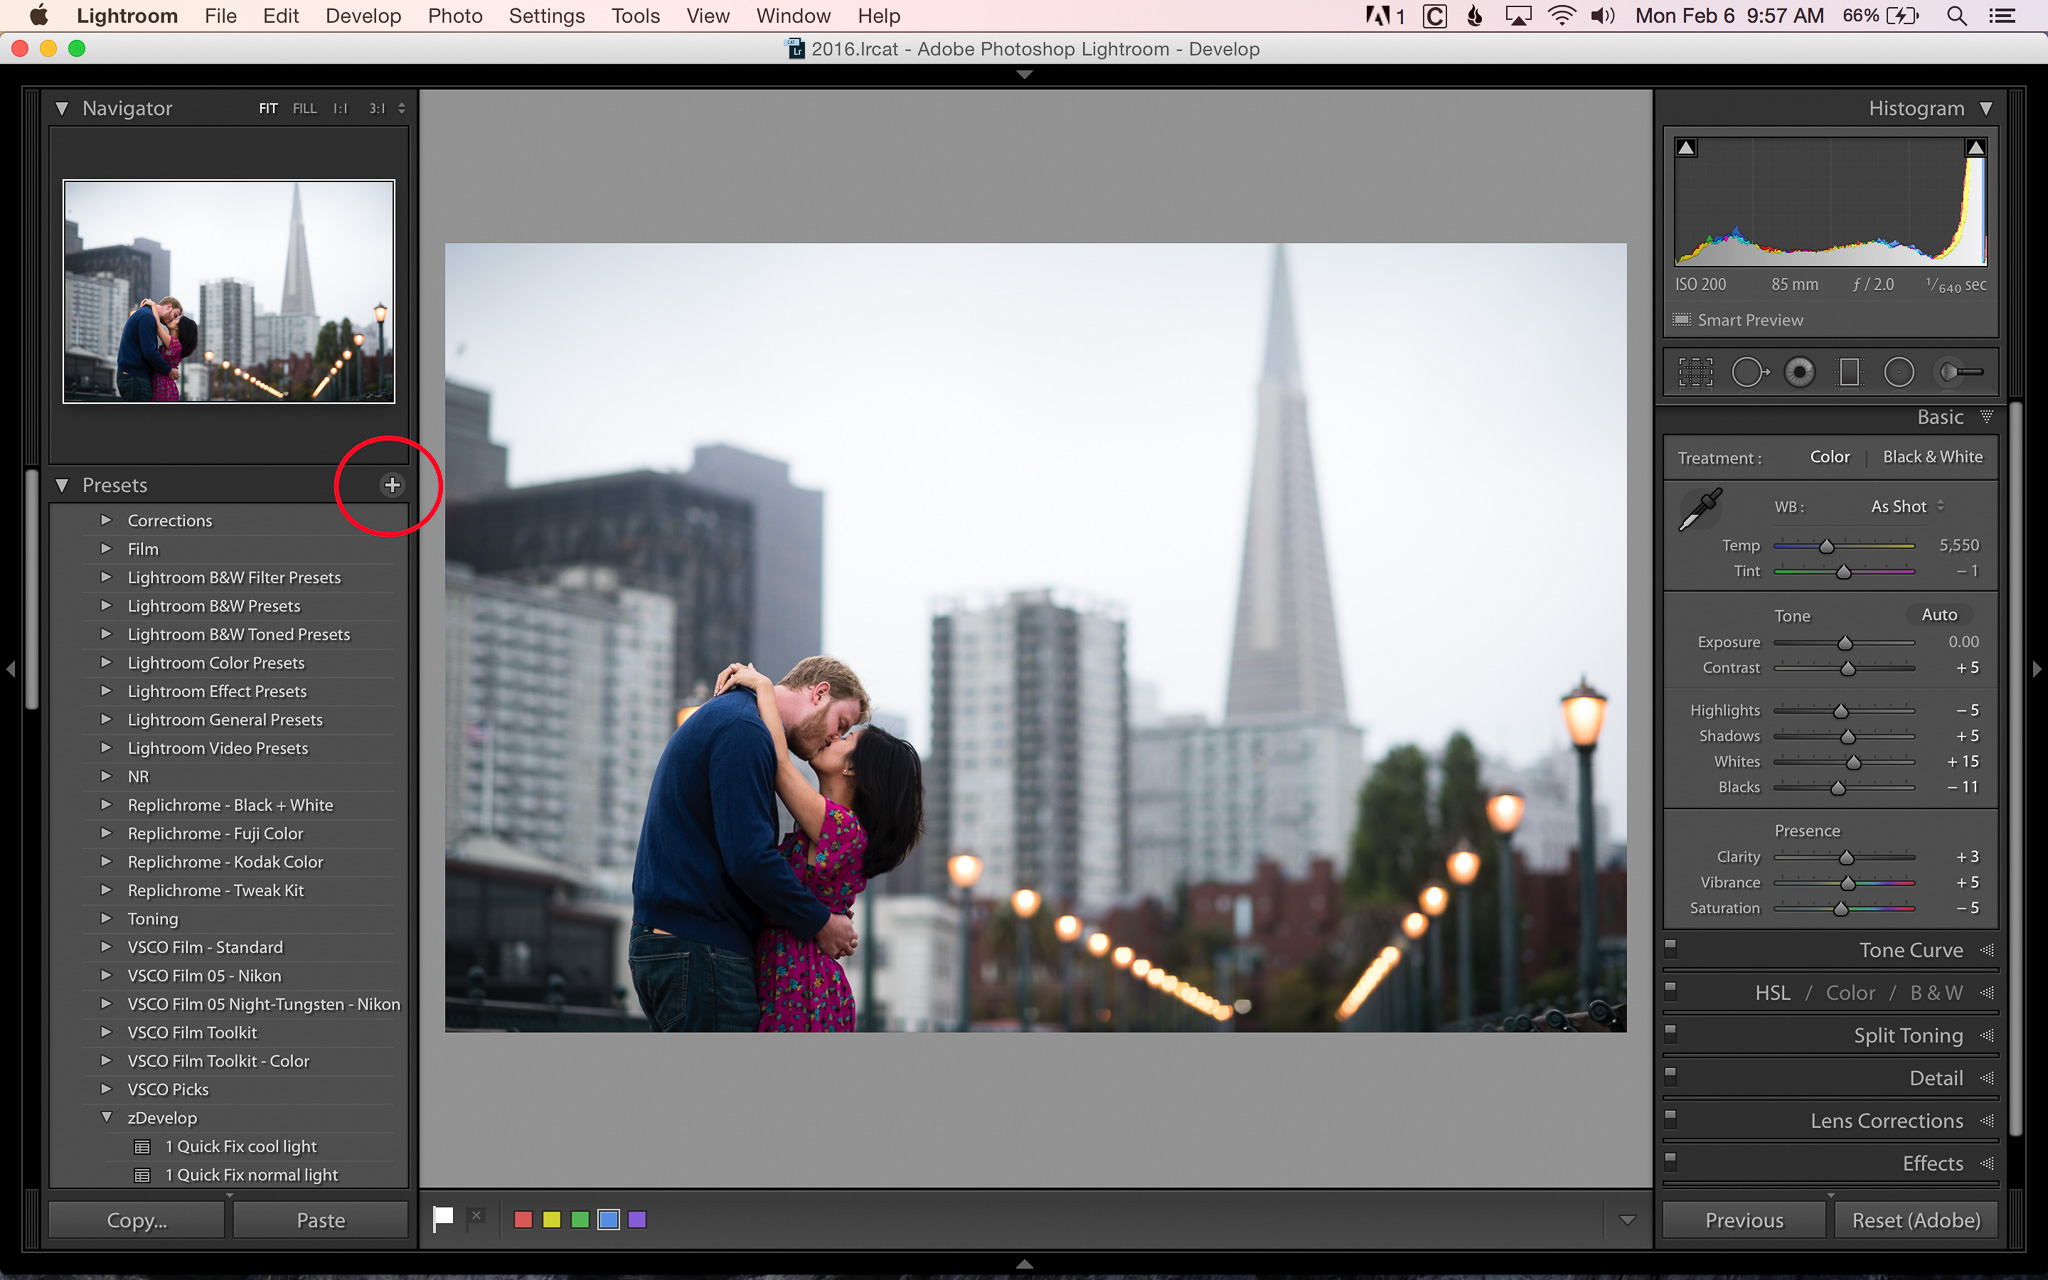
The first step in creating a develop preset is to make edits to an image. When you create a preset, you are basically copying changes that you’ve made to an image and saving them for future use. I’m going to go ahead and show you my “Quick Fix” preset that I apply to every single image I import into Lightroom. Go ahead and open up an image in Lightroom. If you’ve already made edits to the image, make sure to hit “Reset” in the lower-right corner to clear any existing edits. Now apply these settings:
Basic
– Contrast +5
– Highlights -5
– Shadows +5
– Whites +15
– Blacks -10
– Clarity +3
– Vibrance +5
– Saturation -5
Tone Curve
– Highlights +7
– Lights +10
– Darks -5
– Shadows -7
Camera Calibration
– Red Primary Saturation +5
– Green Primary Saturation +10
– Blue Primary Saturation +20
Note: The camera calibration is not critical to the preset and might work great for some camera models and poorly for others. Feel free to exclude these settings if you want to.
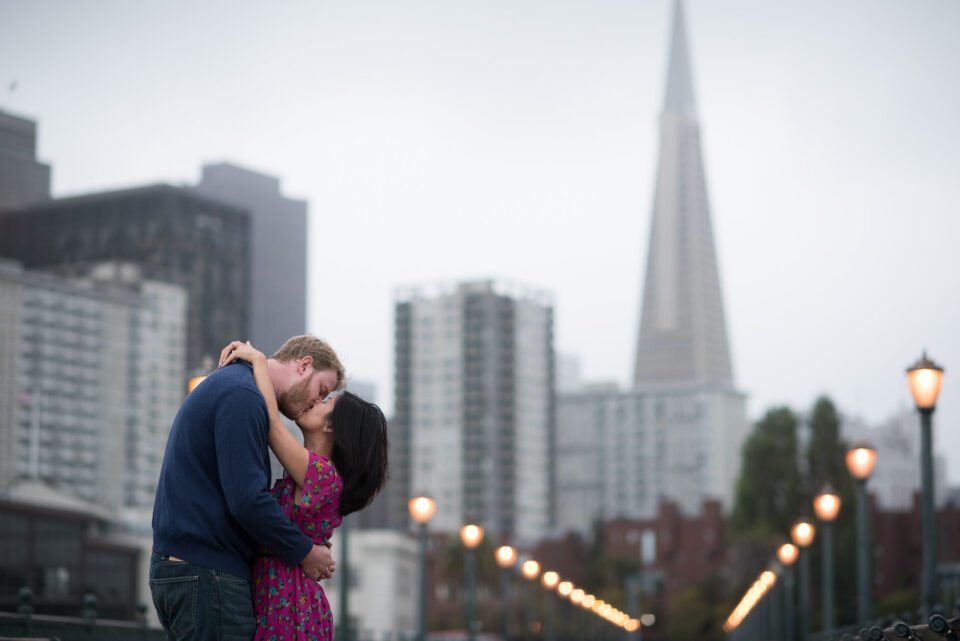
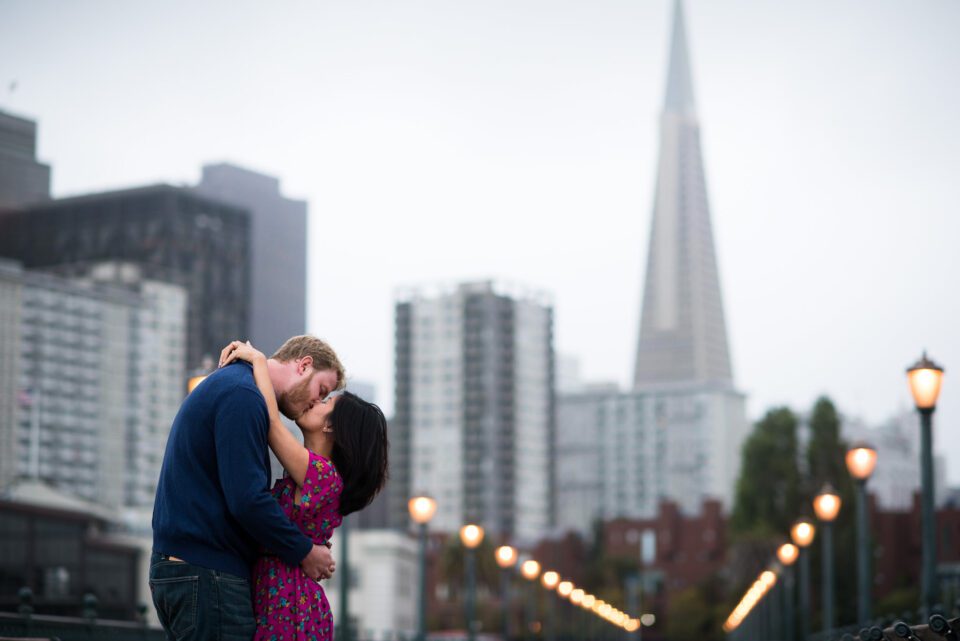
Here you can see the before/after of how these edits affect an image. For me, this is a great starting point for my editing process.
Now that you’ve made all of those edits to your image, you can see the benefit of saving them as a develop preset so you don’t have to go through that process every single time you edit an image. Let’s go ahead and create a develop preset that will apply these particular changes.
On the left pane of the develop module, you should see the Presets sub-module. Click on the “+” sign, which will bring up the New Develop Preset screen.
Creating A Lightroom Develop Preset
Go ahead and give your new preset a name. I named mine “Quick Fix”, but you can call yours whatever you want. You’ll also want to choose a preset folder where your preset is stored. By default it will be stored in a User Presets folder, but you can also create your own. You can always move the presets to a different folder if you change your mind.
The next and most important step is to choose what settings from your current image adjustments you want to include in your new develop preset. Let’s go ahead and include all of the changes we just made. I find it easiest to click “Check None” and then add the individual settings I want to include in my new preset. Here are the settings that we adjusted, so go ahead and check these boxes (Note: Process Version will remain checked even after you choose “Check None”. Unless you work with images that were edited in a much older version of Lightroom, you can leave this checked):
– Contrast
– Highlights
– Shadows
– White Clipping
– Black Clipping
– Tone Curve
– Clarity
– Saturation
– Vibrance
– Calibration
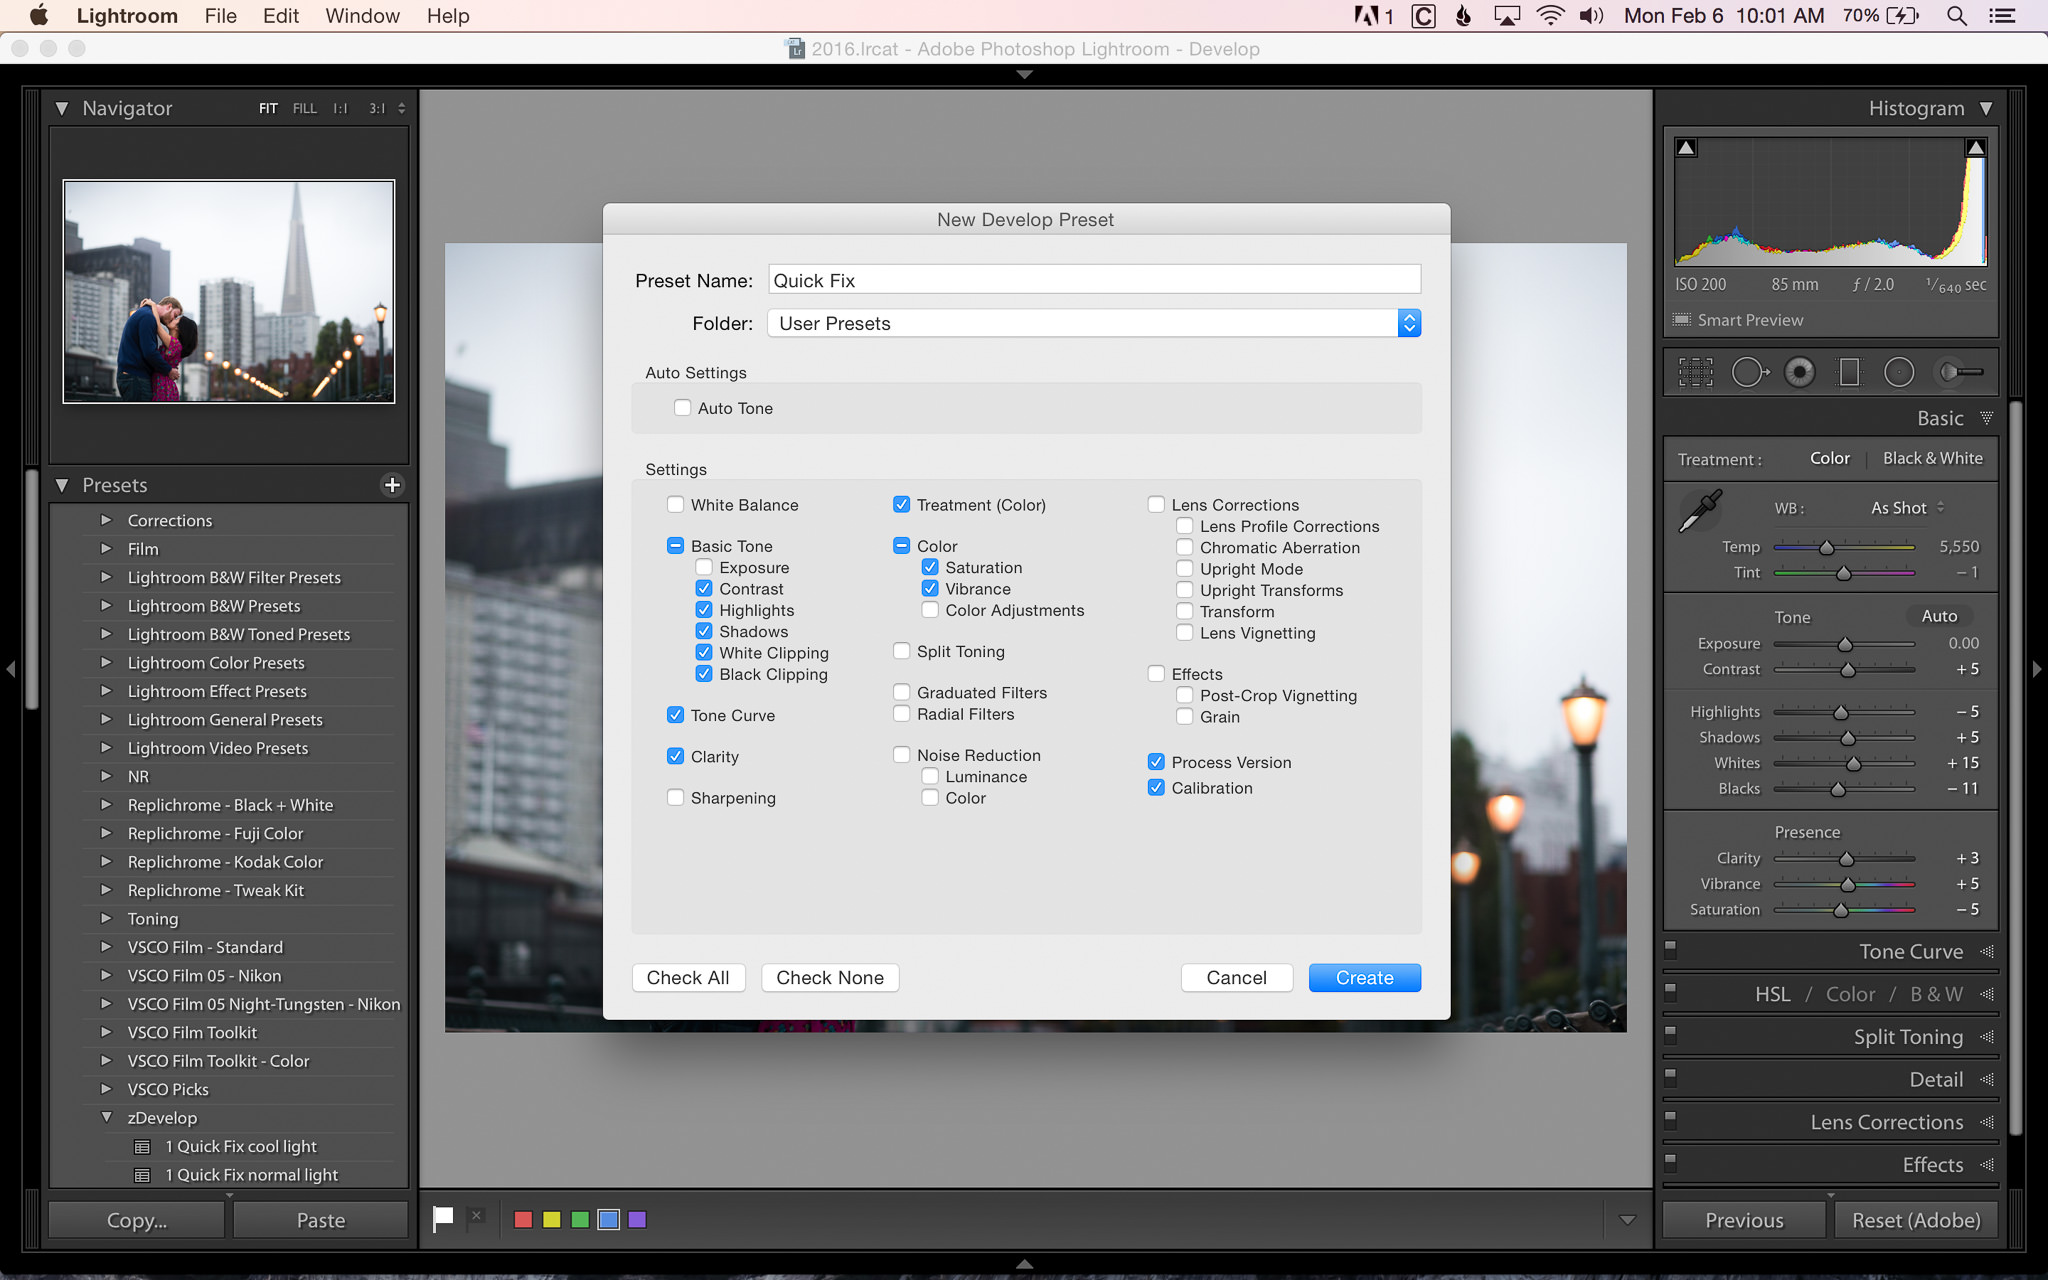
Creating A Lightroom Develop Preset Dialogue
Once they’re all checked, click “Create”. Now if you look under the User Presets section of the Presets sub-module, you should see the develop preset that you just made. To use this preset, in the Develop module choose a new image that hasn’t been edited and simply click your new preset. You should see all of those adjustments instantly get applied to your image. Wasn’t that easy? Now you can quickly apply those changes to any image in the future.
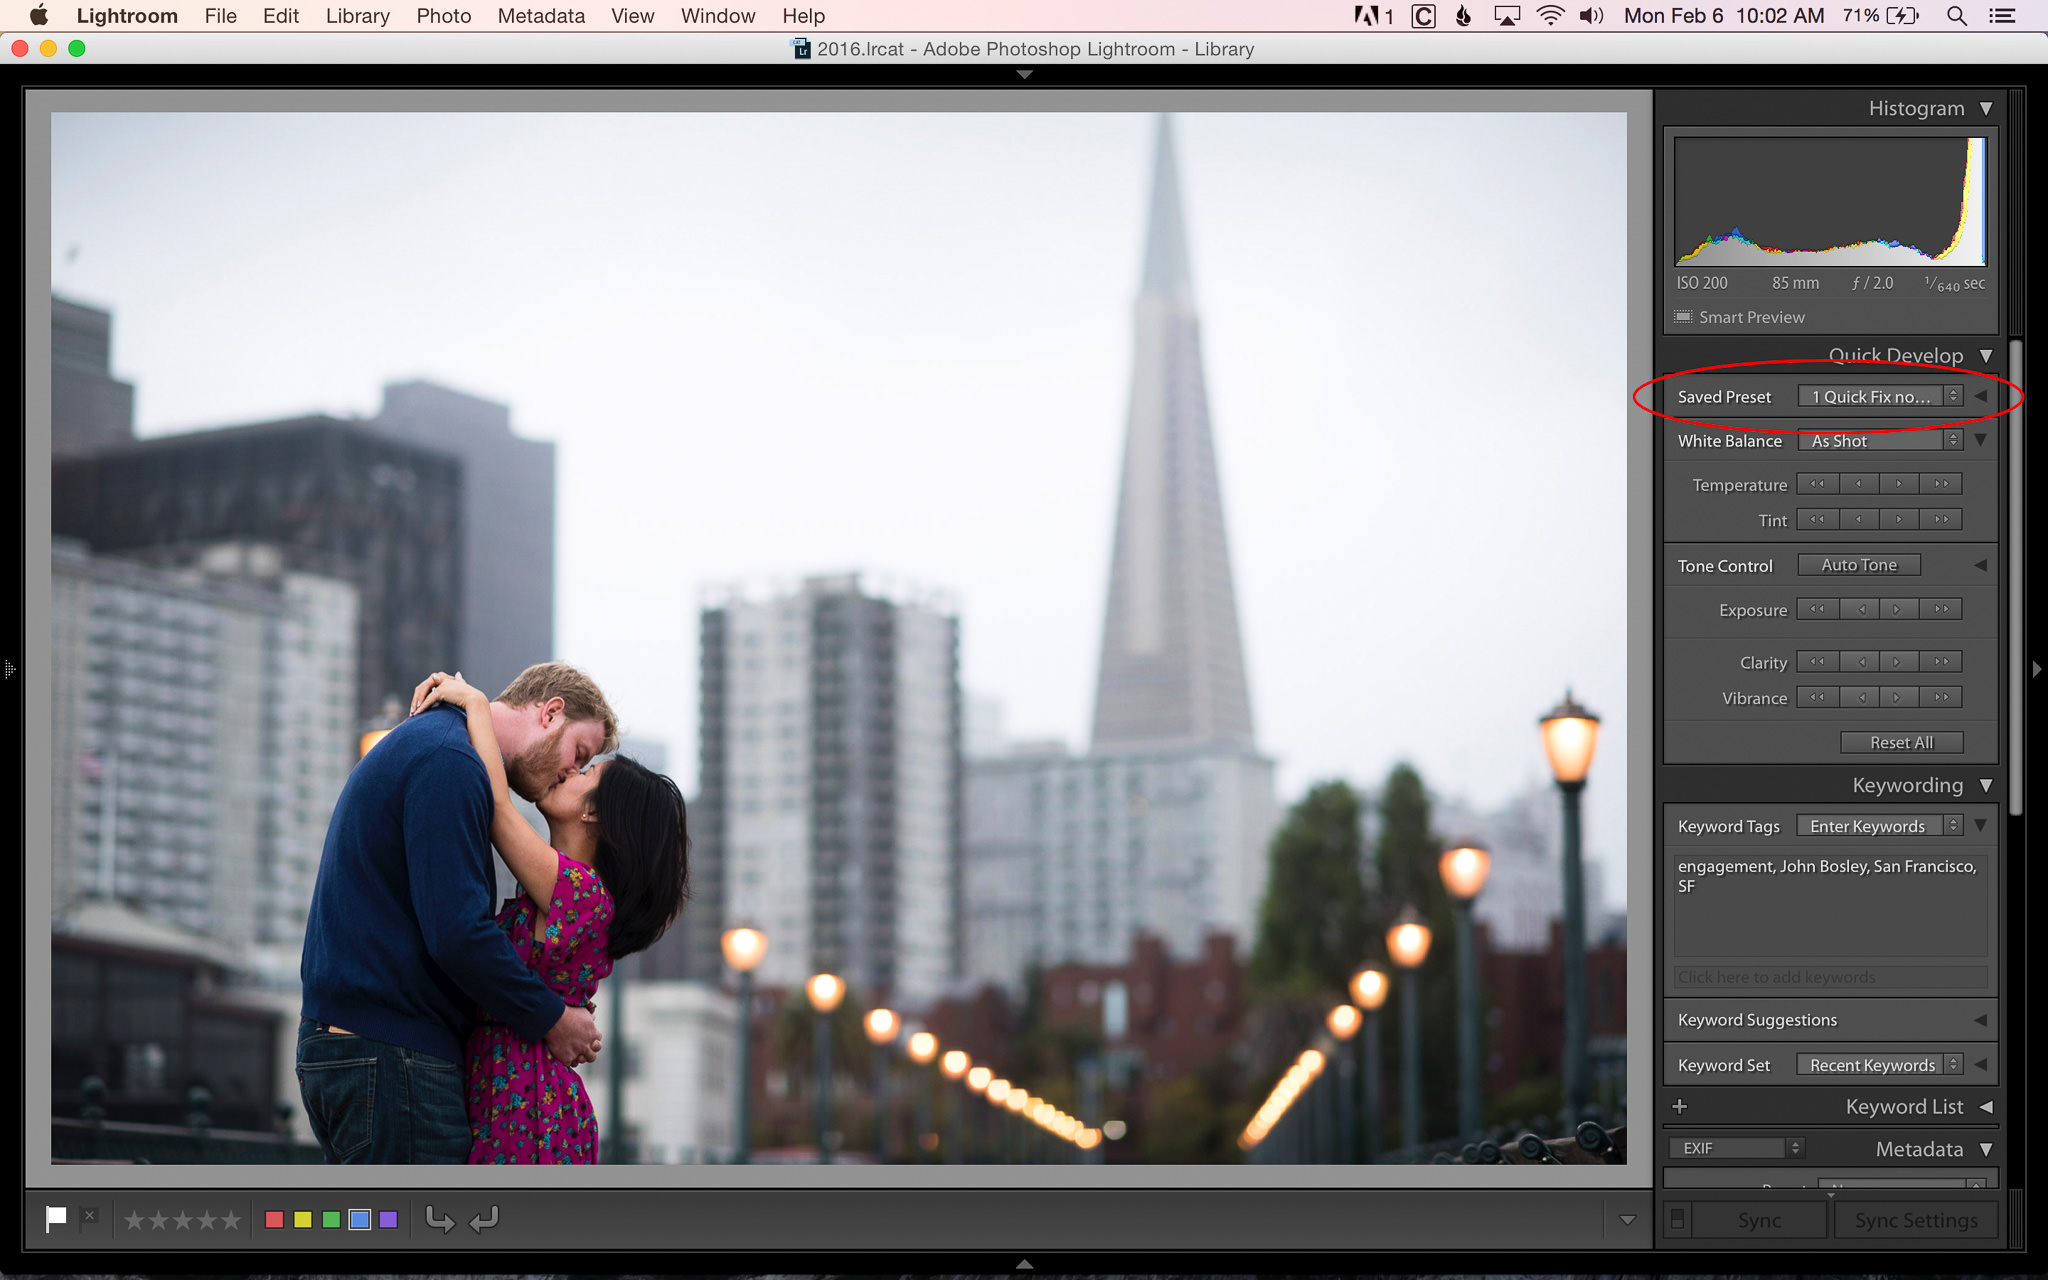
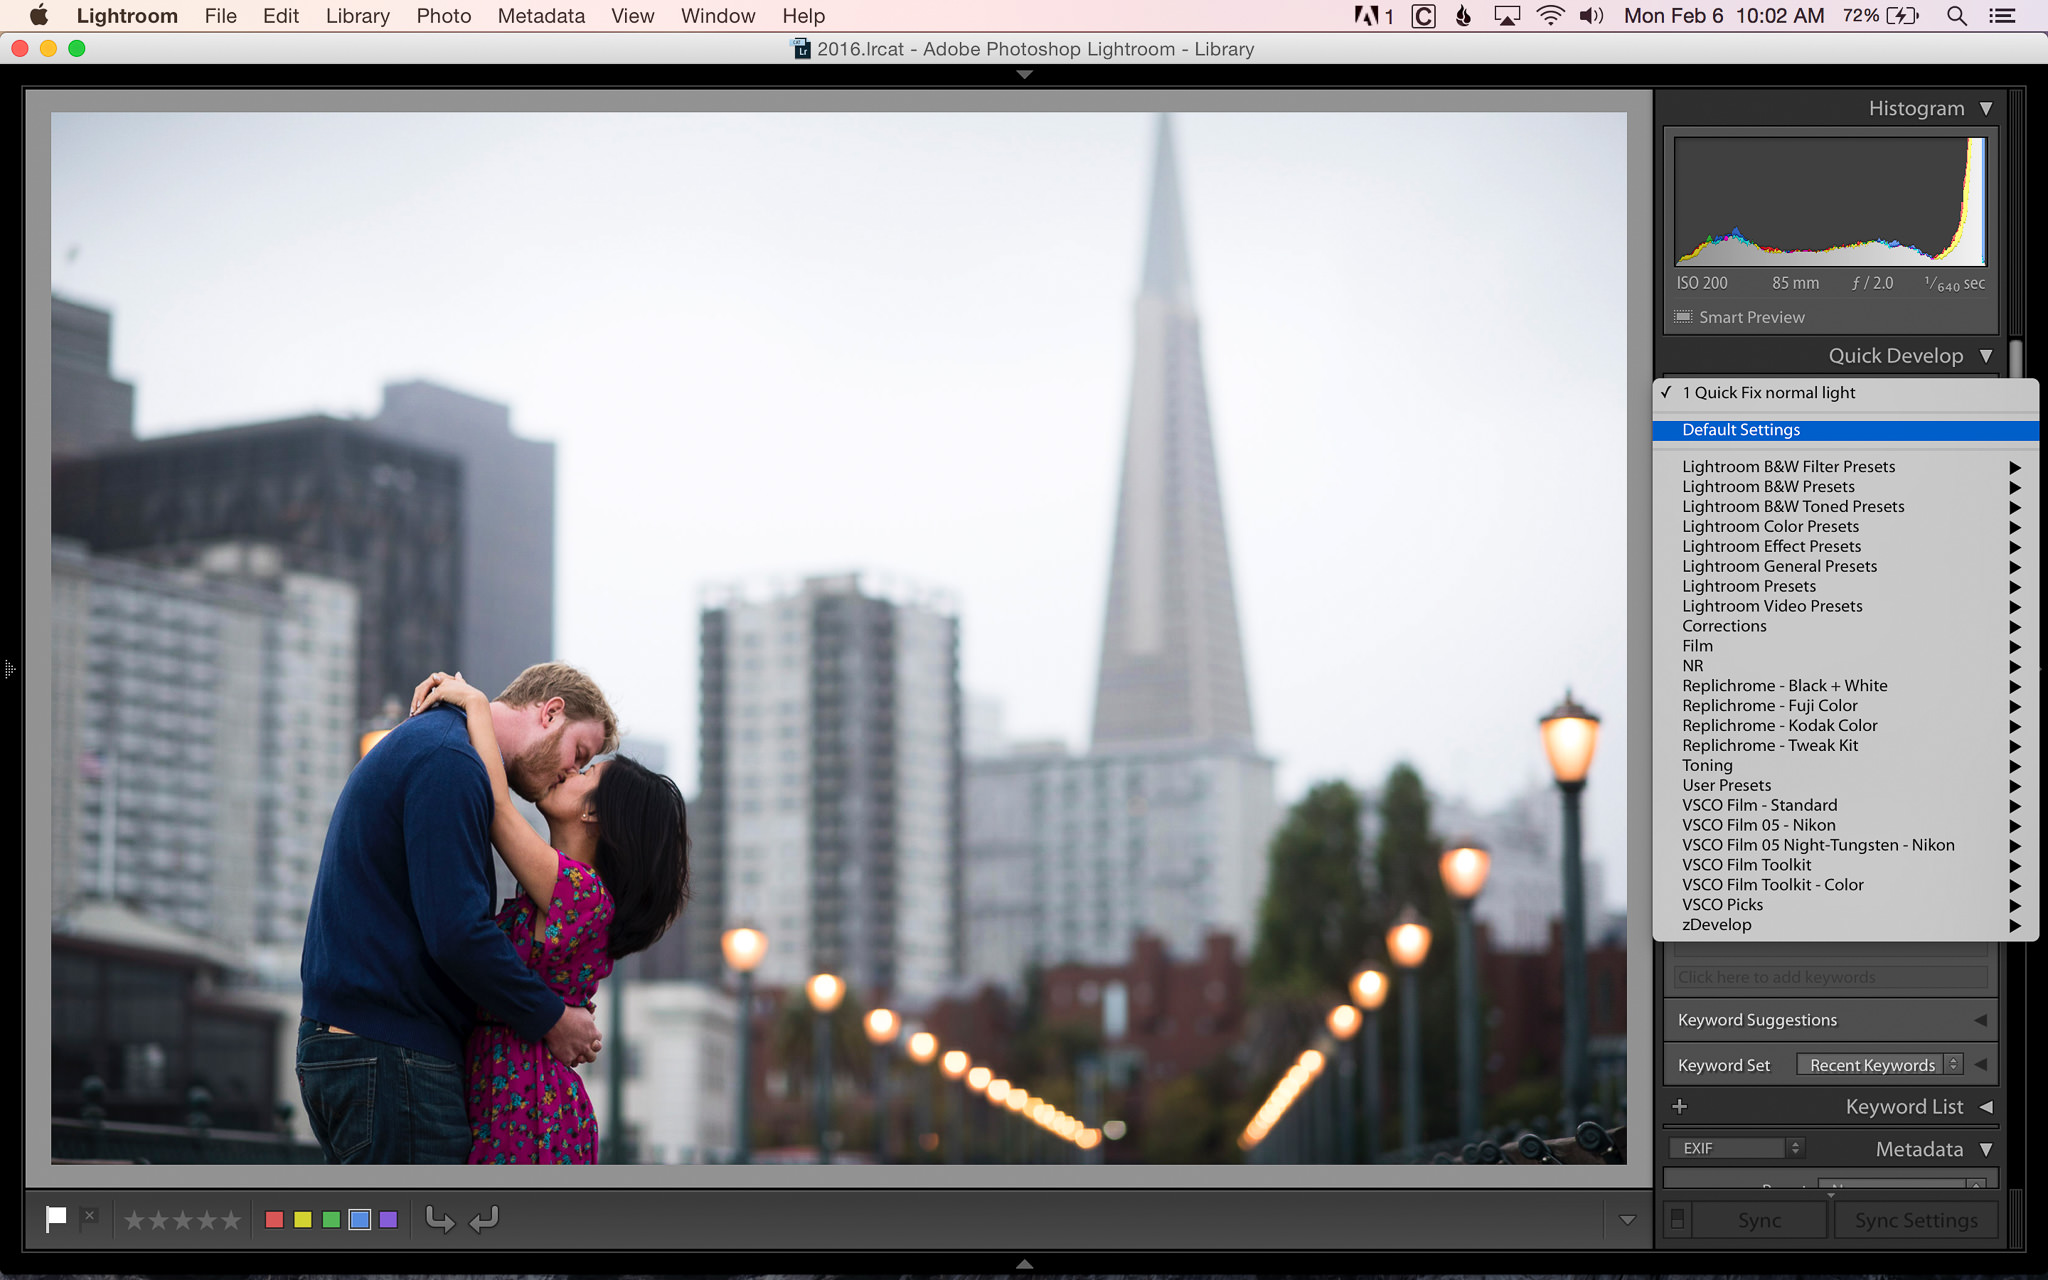
Applying Develop Presets On Import
You’re not limited to using develop presets on individual images in the develop module. You can also apply them to images on import. In the Loupe or Grid view, in the right pane you should see the Quick Develop sub-module. The first section of that says “Saved Preset”. Choose the develop preset that you want to apply to images on import. Once you choose one, it will get applied to every image you import in the future (even if you close Lightroom) until you change it to something else. If you want to remove the develop preset so it doesn’t get applied on import, just change it back to “Default Settings”.
Applying A Lightroom Develop Preset On Import
Applying A Lightroom Develop Preset On Import
Modifying A Develop Preset
If you decide you want to change or update a develop preset, it’s really easy. The process is almost exactly the same as creating a develop preset. First, go ahead and make the changes to the image that you want to make to the preset. Maybe in my “Quick Fix” example you prefer more highlight recovery and want to change it from -5 to -25. Next, in the Develop module, go to the develop preset you want to modify, right click on it and click “Update With Current Settings”. The “Update Develop Preset” screen will appear. Similar to when you create a preset, you’ll need to choose which settings to include in the update. Keep in mind, you need to check all of the settings you want to include in your updated develop preset, not only the ones that have changed.
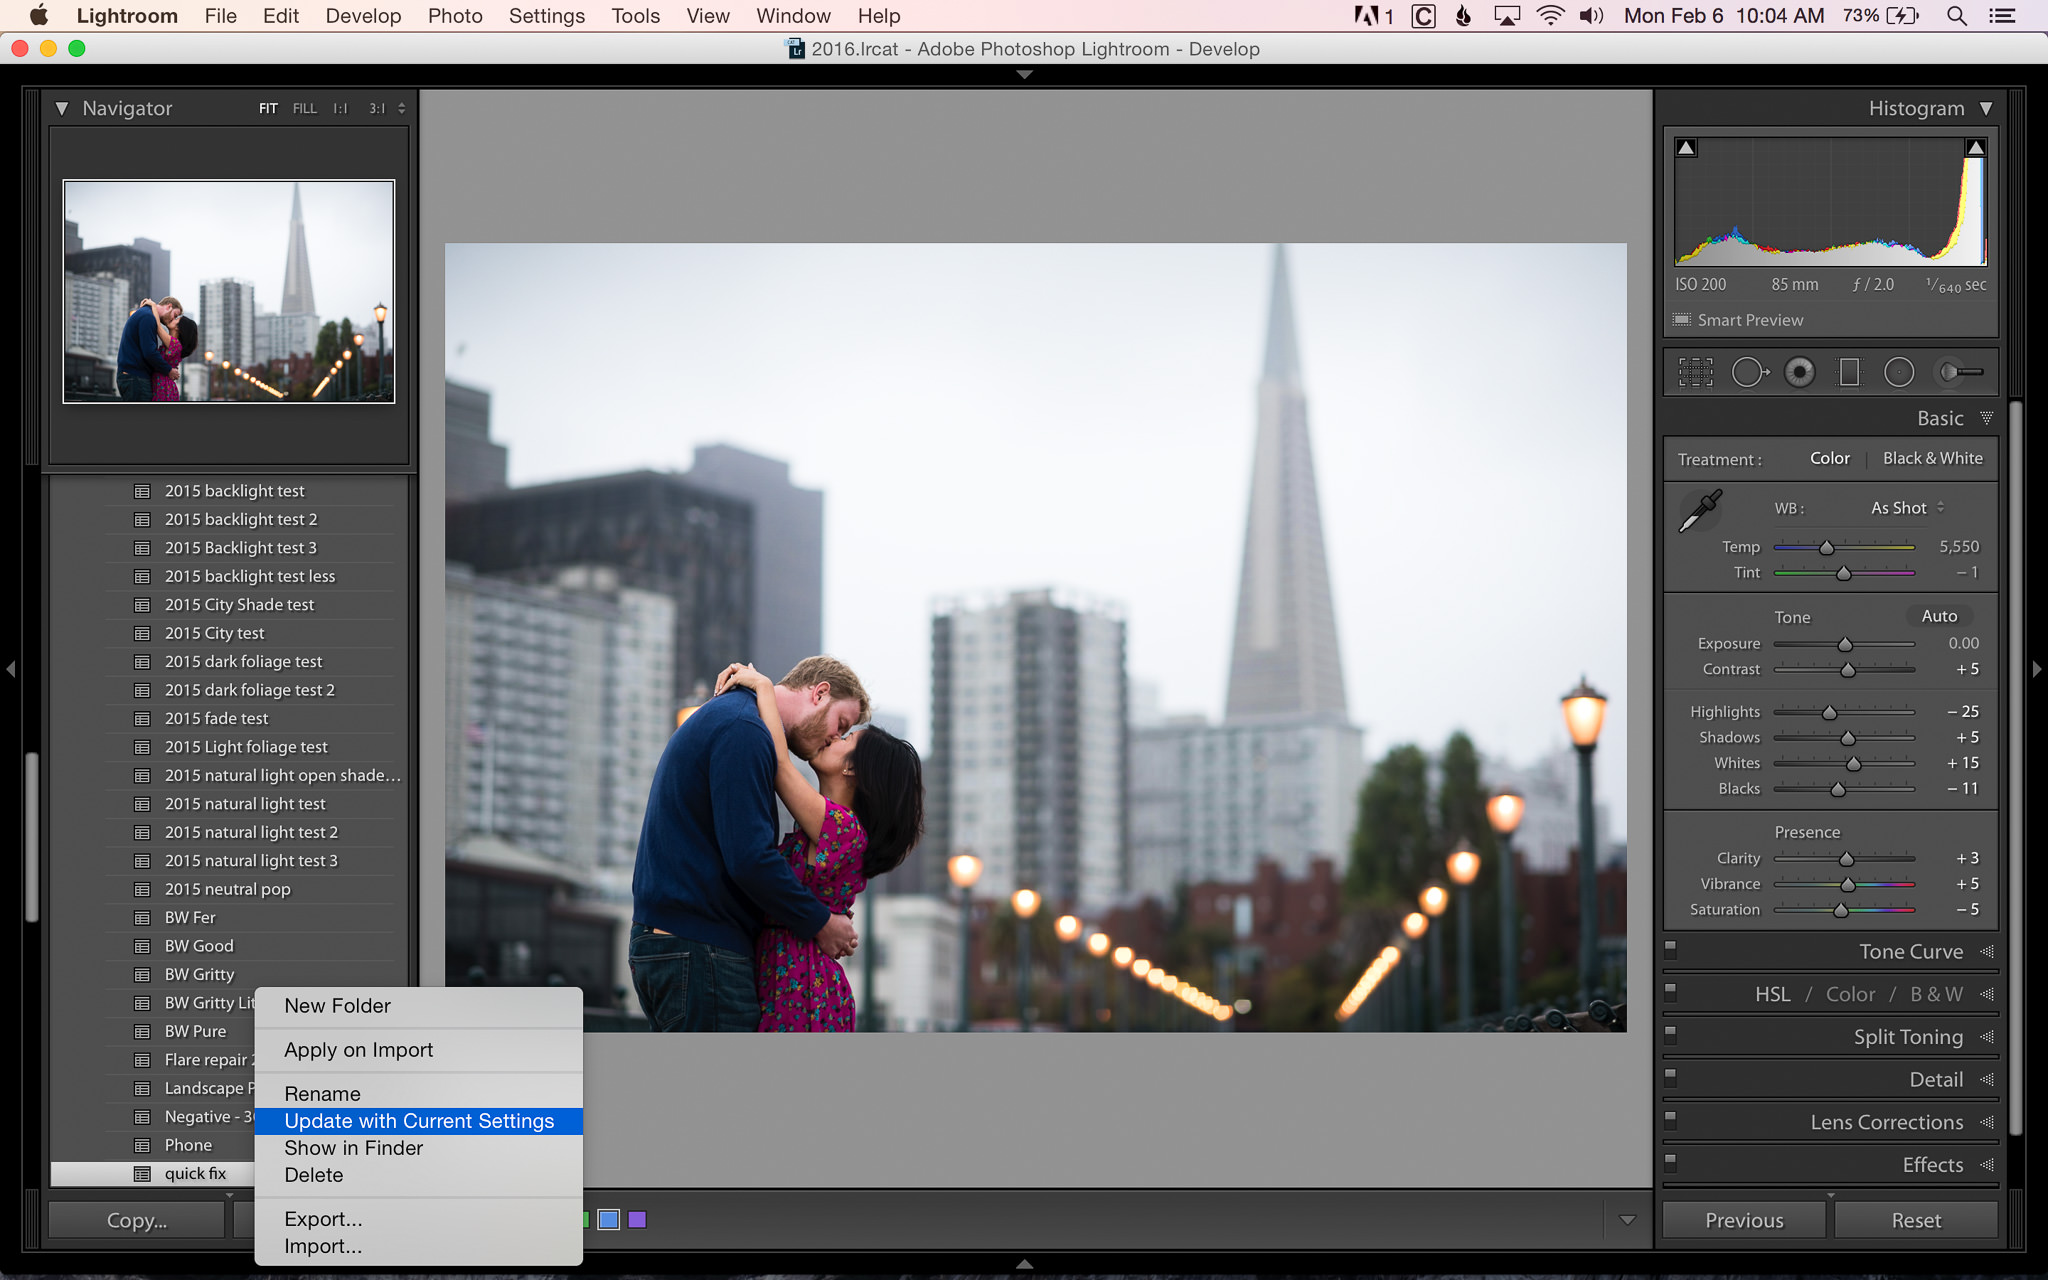
Updating A Lightroom Develop Preset
Other Considerations
You might be asking, “Why can’t I just check all of the boxes when I create a develop preset?” That’s a good question. I did that exact thing when I started creating develop presets, but quickly figured out why it’s not a good idea. Let’s say you’ve just made a bunch of edits to an image and decide to add a develop preset that adds a warm tone to your image. If, when you created your “warm tone” preset, you selected exposure in addition to whatever adjustments you wanted to make, it would adjust the exposure of your image that you’ve already edited.
This is why earlier I suggested that you choose “Check None” when creating your develop presets. If you only choose the settings you want to adjust with a given preset, you won’t accidentally affect other settings that you may have already adjusted.
If you already have develop presets that you like to use, but they affect too many settings, adjusting them is very easy. Just modify the preset with the process I mentioned above, but uncheck any adjustments you don’t want to make. For example, if you have a preset that adjusts exposure, contrast and saturation, but you don’t want it to adjust exposure, simply update the preset and only check contrast and saturation. That preset will no longer affect exposure.
Creating A Library Of Develop Presets
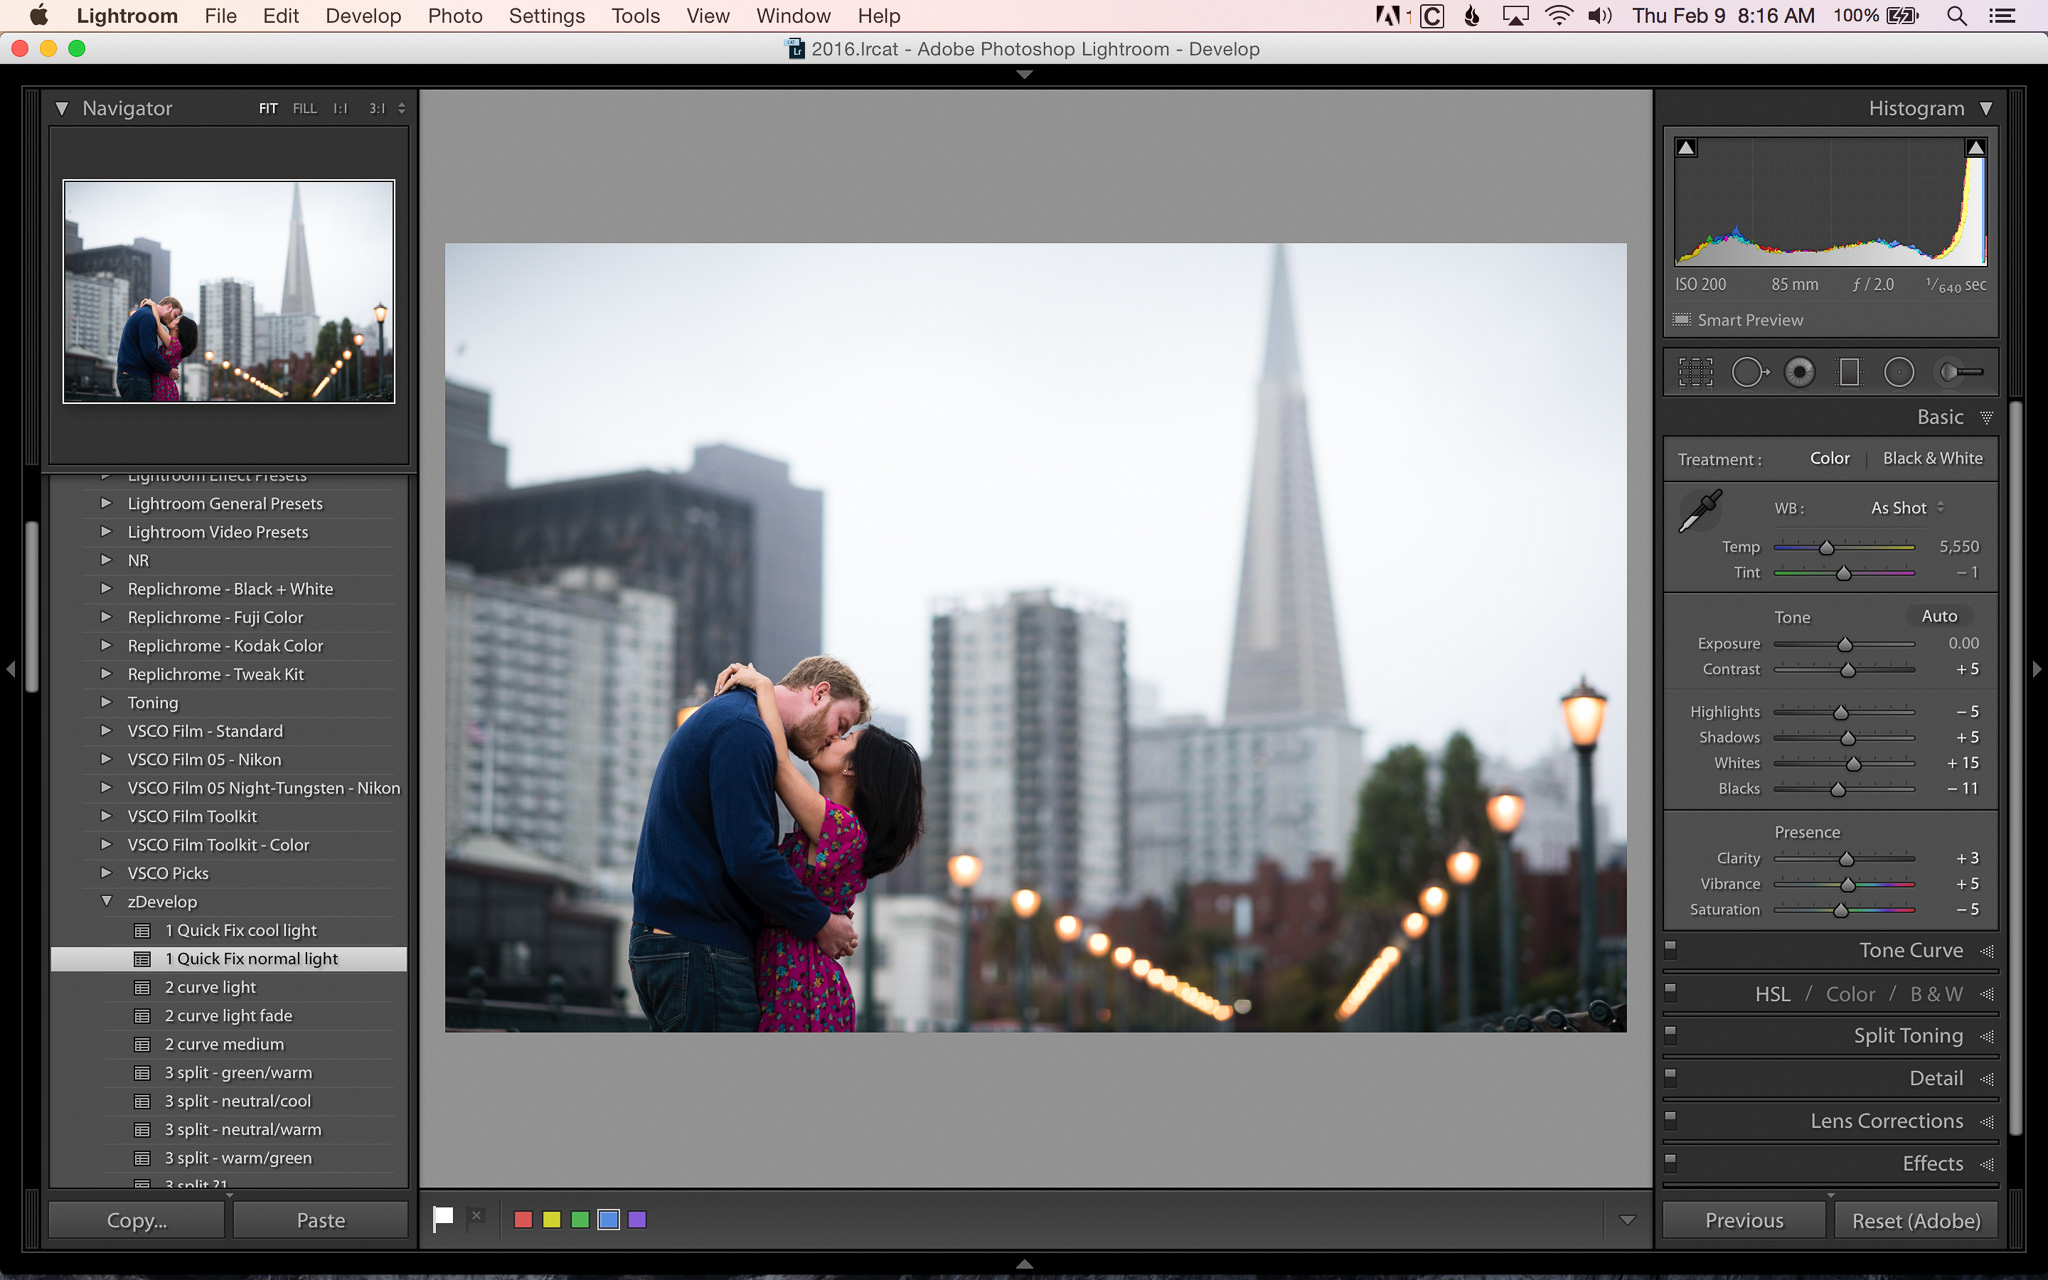
Once you’ve created a few develop presets and get a feel for how they fit into your workflow, you can start to create your own library of presets. After years of figuring out what works the best for me, I’ve settled on a system that fits nicely into my editing process. Basically, I name my presets in the order that I work. Here’s a few of my basic editing presets:
– 1 Quick Fix Cool Light
– 1 Quick Fix Normal Light
– 2 Curve Light
– 2 Curve Medium
– 3 Split Toning Warm
– 3 Split Toning Cool
– 4 HSL Skin 1
– 4 HSL Skin 2
I use them in different steps of my editing process. By default, “Quick Fix Normal Light” gets applied on import, but while I’m editing if I come across an image with cool light I’ll try “Quick Fix Cool Light” and see if it works better. After making some basic adjustments, I’ll move on to the “2”s and decide if I want to adjust the curve. Once I have the basic editing done to the image, I’ll move on to “3” and see if it can benefit from some split toning. Finally, I’ll move to “4” if I feel like there are some issues with skin tone.
The reason this system works so well for me is that each develop preset does one specific thing to an image. If I follow this order, I don’t have to worry about changing an adjustment that I’ve already made to an image. I also found that numbering them helps, otherwise my presets get sorted alphabetically, which doesn’t necessarily follow my workflow.
I want to point out that you don’t have to create presets that can be used on all of your images. Sometimes I will make very complex edits to an image and will save those edits as a develop preset to save myself having to repeat the effort again in the future. For example, I once photographed a wedding in a barn. The interior of the barn was dark with incandescent lighting, but there was still window light coming in from outside. Because of the different color temperature of these two light sources, I ended up with very blue highlights wherever the window light entered the image. I was able to correct it through split toning and saved my edits as a preset in case I ever run into the same situation again.
The possibilities for develop presets are virtually endless. You can create presets that affect only one small part of your editing process or presets that apply an entire range of edits with one click. If you find yourself constantly applying graduated filters to the sky, you can create a graduated filter preset. If you have a favorite group of settings for black and white images, save them as a preset. If you don’t like Lightroom’s lens corrections, you can update them with your own lens correction preset. I could go on and on with suggestions, but I think you get the idea.
Using Multiple Presets
One of the great things about using develop presets is that you can use more than one on an image. In the example I gave above regarding my workflow, I might use four different presets on an image (one from each section of my workflow preset library). Since I only create presets that affect one particular setting, I don’t have to worry about conflicts between them.
Let’s take a look at how that looks in practice. In this first image, I applied my “1 Quick Fix Normal Light” preset, which affects settings in the Basic and Tone Curve sub-modules.
Creating Lightroom Develop Presets – Quick Fix Added
Next, I add my preset “2 Curve Light Fade” preset, which affects the tone curve. Note that this will override the tone curve setting that was applied by my previous preset, but everything else remains unchanged!

Creating Lightroom Develop Presets – Tone Curve Added
Next, I add my “3 Split Shade Fix” preset to warm up the image a bit. This only affects the split toning in my image. Nothing else gets affected.
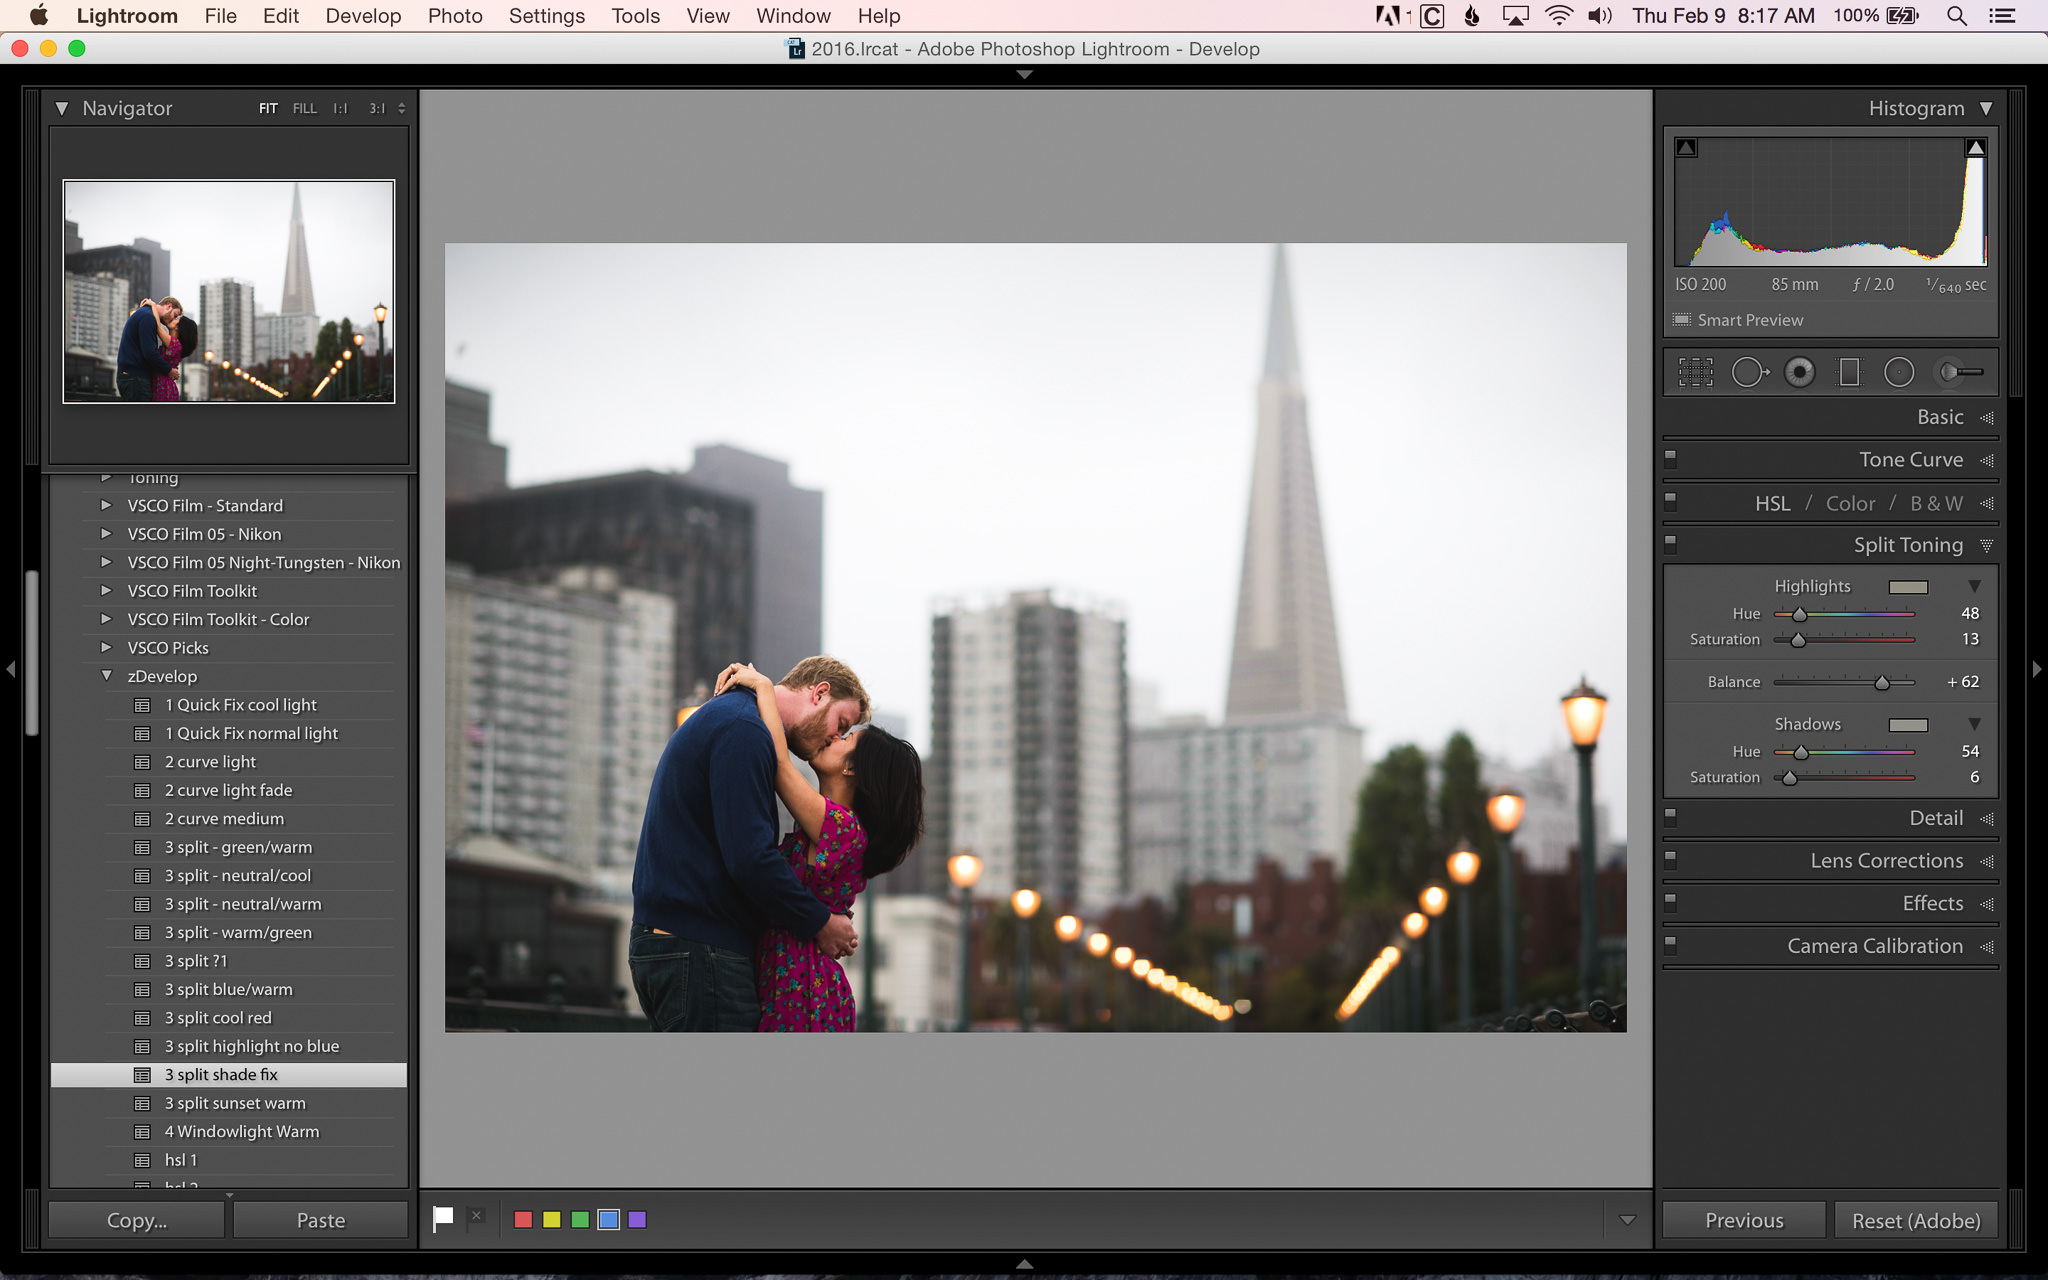
Creating Lightroom Develop Presets – Split Toning Added
Finally, I add my “4 HSL 1” preset, which affects the hue/saturation/luminance in the image and is intended to fix red skin tones. Again, no previous adjustments (basic settings, tone curve or split toning) were affected by this preset.
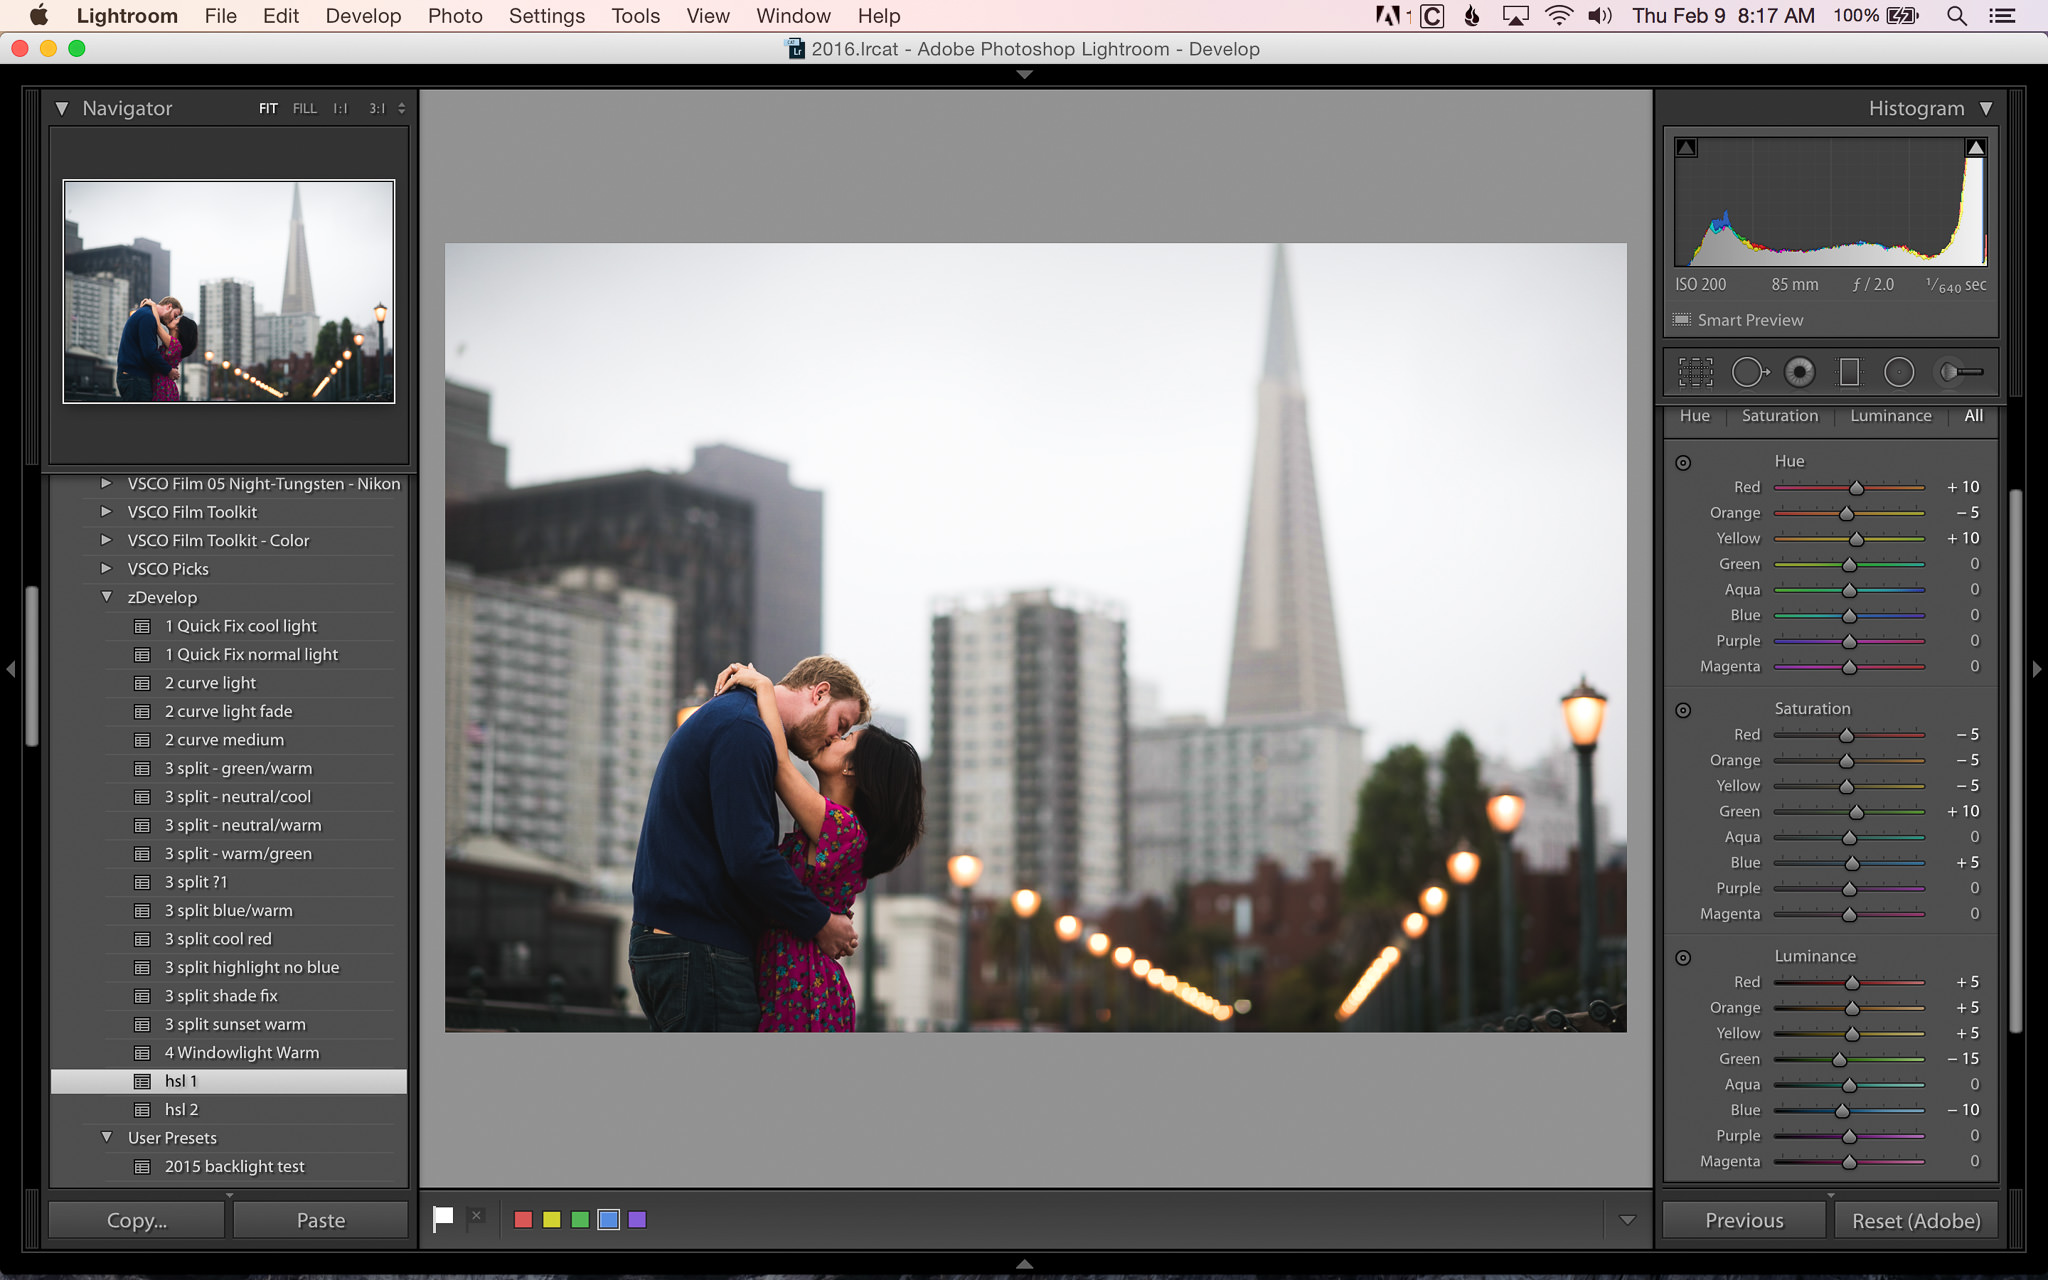
Creating Lightroom Develop Presets – Skin Fix (Hue Saturation Luminance) Added
So now I effectively have 4 presets “stacked” on top of each other in the same image.
Conclusion
Develop presets are a powerful, time-saving tool that are built into Lightroom. They are not meant to be one-click solutions, although at times they might work like that. Instead, they are meant to save you time and give you a starting point for image corrections. You can create develop presets that can be used on every single image, but you can also create very specialized presets that you will only use occasionally.
Based on my experience and the mistakes I’ve made, here are my top tips for creating develop presets:
– Don’t include all of the settings when you create a preset. Only include the settings that you’ve adjusted and want to apply to images in the future. This means image-specific adjustments like white balance and exposure will probably not be included in most develop presets.
– Create a naming system for your presets that makes sense to you and your workflow. If you don’t know what a preset does or where it fits into your workflow, chances are you won’t use it. You don’t have to number your presets like I do, but even something as simple as creating different folders can greatly help organize your presets.
– Don’t limit yourself to the type of presets that you make. Get creative. Ask yourself, “Are the changes that I just made to this image something that I might want to do again in the future?”. If so, create a develop preset. It might just come in useful someday.
Also, for reference, my final edit of this image looks completely different than what you’ve seen up to this point. I did use my Quick Fix preset as a starting point, but all of my other corrections were done manually. Remember, develop presets are not intended to be one-click solutions! Here’s how this image looked as delivered to my clients: